Kubernetes
According to the Kubernetes documentation, the API Server of Kubernetes can be authenticated using OpenID Connect (OIDC). Este artigo irá guiá-lo sobre como configurar a autenticação no Kubernetes usando o Casdoor.
Requisitos de Ambiente
Pré-requisitos:
- Um cluster Kubernetes.
- A Casdoor application like this demo website.
- ferramenta de comando kubectl (opcional).
Kubernetes oidc-issuer-url only accepts URLs which use the https:// prefix.
Então, sua aplicação Casdoor deve ser implantada em um site HTTPS.
Passo 1: Criando um App Casdoor e Conta de Usuário para Autenticação
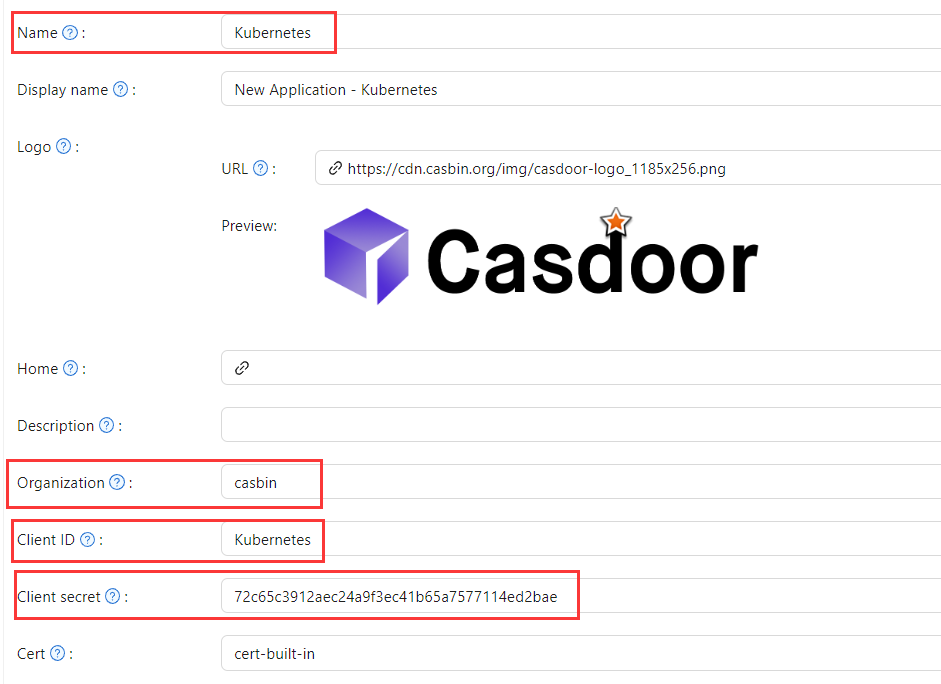
In Casdoor add an application (e.g. Kubernetes). Note Name, Organization, Client ID, and Client secret. Enable the grant types the cluster will use.

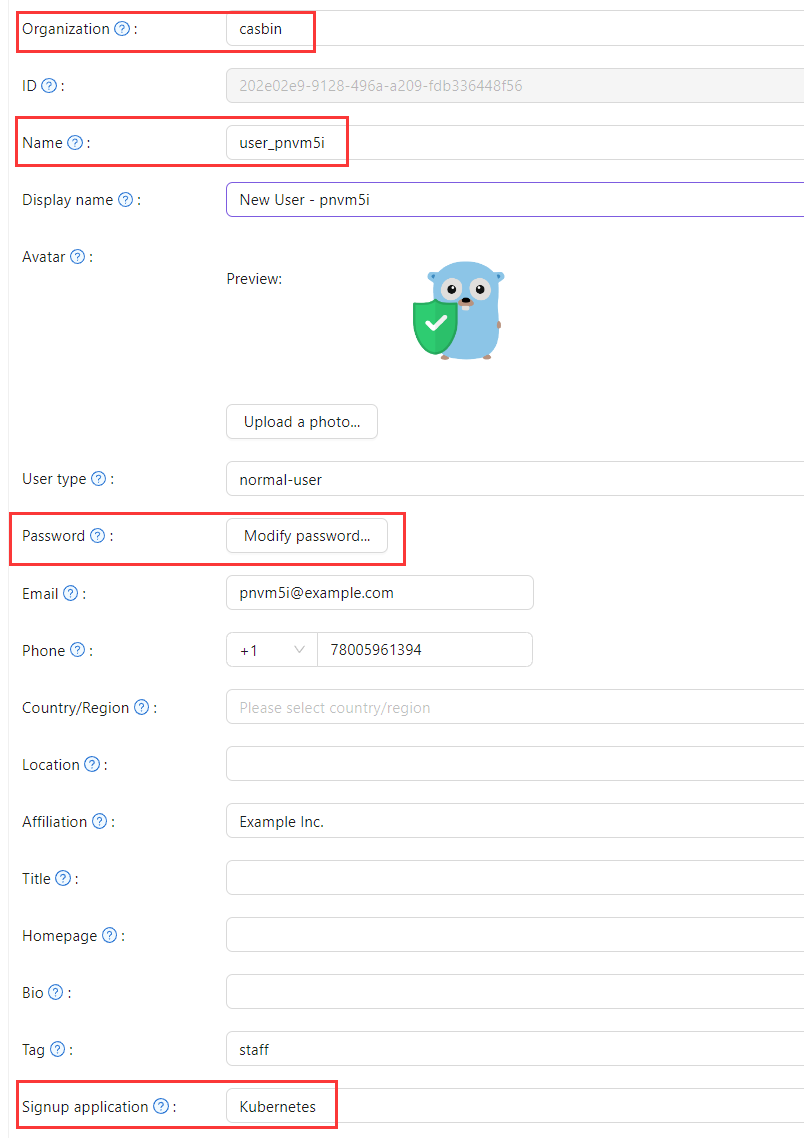
Add a user; set Organization and Signup application to the application you created.
Passo 2: Configurar o Servidor API do Kubernetes com Autenticação OIDC
To enable the OIDC plugin, set the following flags on the API server:
--oidc-issuer-url: URL of the provider that allows the API server to discover public signing keys.--oidc-client-id: A client id that all tokens must be issued for.
Este artigo usa minikube para demonstração. Configure the OIDC plugin for the minikube API server using the following command at startup:
minikube start --extra-config=apiserver.oidc-issuer-url=https://demo.casdoor.com --extra-config=apiserver.oidc-client-id=294b09fbc17f95daf2fe
Passo 3: Testar Autenticação OIDC
Obter Informações de Autenticação
Devido à falta de uma interface frontend no kubectl, a autenticação pode ser realizada enviando uma solicitação POST para o servidor Casdoor.
Here is the code in Python which sends a POST request to the Casdoor server
and retrieves the id_token and refresh_token:
import requests
import json

url = "https://demo.casdoor.com/api/login/oauth/access_token"
payload = json.dumps({
   "grant_type": "password",
   "client_id": "Kubernetes",
   "client_secret": "72c65c3912aec24a9f3ec41b65a7577114ed2bae",
   "username": "user_3u94sf",
   "password": "123456"
})
response = requests.request("POST", url, data=payload)

print(response.text)
Após executar este código, você deve receber uma resposta semelhante à seguinte:
{
  "access_token": "xxx",
  "id_token": "yyy",
  "refresh_token": "zzz",
  "token_type": "Bearer",
  "expires_in": 72000,
  "scope": ""
}
Use the obtained id_token to authenticate with the Kubernetes API server.
Autenticação Baseada em Requisição HTTP
Adicione o token ao cabeçalho da requisição.
curl https://www.xxx.com -k -H "Authorization: Bearer $(id_token)"
https://www.xxx.comis the Kubernetes API server deployment address.
Autenticação Baseada no Cliente Kubectl
Método de Arquivo de Configuração
Write the following configuration to the ~/.kube/config file.
Você deve substituir cada item de configuração no arquivo de configuração acima com os valores que obteve anteriormente.
users:
- name: minikube
  user:
    auth-provider:
      config:
        client-id: Kubernetes
        client-secret: 72c65c3912aec24a9f3ec41b65a7577114ed2bae
        id-token: $(id_token)
        idp-issuer-url: https://demo.casdoor.com
        refresh-token: $(refresh_token)
      name: oidc
Access the API server with kubectl. Tente executar um comando de teste.
kubectl cluster-info
Método de Argumento de Linha de Comando
Alternatively, pass the id_token in kubectl command-line parameters.
kubectl --token=$(id_token) cluster-info