Spring Security OAuth
Casdoor може використовувати протокол OIDC як IDP для підключення різних застосунків. У цьому посібнику ми використаємо Spring Security як приклад, щоб показати, як використовувати OIDC для підключення до ваших застосунків.
Крок 1: Розгортання Casdoor
Розгорніть Casdoor. Див. Server installation. Переконайтеся, що сервер працює і ви можете відкрити сторінку входу та увійти як built-in/admin з паролем, який ви встановили. Див. Sign in to the admin console.
Крок 2. Налаштуйте застосунок Casdoor
- Створіть новий додаток Casdoor або використовуйте існуючий.
- Додайте ваш URL перенаправлення (детальніше про отримання URL перенаправлення див. у наступному розділі).
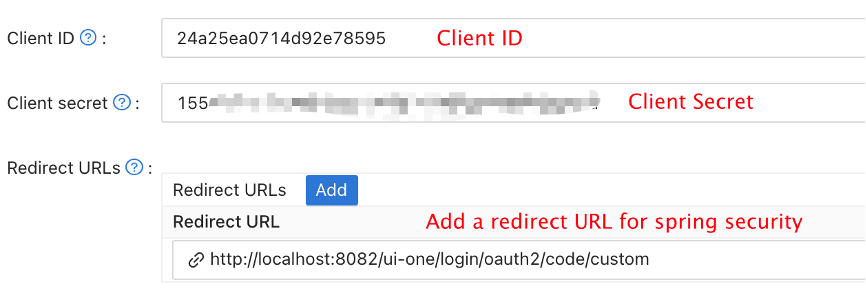
- Додайте бажаний провайдер і заповніть будь-які додаткові налаштування.
Запишіть Client ID та Client secret зі сторінки застосунку для наступного кроку. OIDC discovery: http://<CASDOOR_HOSTNAME>/.well-known/openid-configuration.
Крок 3. Налаштуйте Spring Security
Spring Security має нативну підтримку OIDC.
Ви можете налаштувати параметри Spring Security OAuth2 Client:
Замініть заповнювачі на дані вашого екземпляра Casdoor (Client ID, Client secret тощо).
- application.yml
- application.properties
spring:
  security:
    oauth2:
      client:
        registration:
          casdoor:
            client-id: <Client ID>
            client-secret: <Client Secret>
            scope: openid,profile,email
            authorization-grant-type: authorization_code
            redirect-uri: <Redirect URL>
        provider:
          casdoor:
            issuer-uri: http://CASDOOR_HOSTNAME
            user-name-attribute: preferred_username
spring.security.oauth2.client.registration.casdoor.client-id=<Client ID>
spring.security.oauth2.client.registration.casdoor.client-secret=<Client Secret>
spring.security.oauth2.client.registration.casdoor.scope=openid,profile,email
spring.security.oauth2.client.registration.casdoor.authorization-grant-type=authorization_code
spring.security.oauth2.client.registration.casdoor.redirect-uri=<Redirect URL>

spring.security.oauth2.client.provider.casdoor.issuer-uri=http://CASDOOR_HOSTNAME
spring.security.oauth2.client.provider.casdoor.user-name-attribute=preferred_username
Завдяки issuer-uri Spring Boot під час запуску зчитує документ виявлення Casdoor і заповнює кінцеві точки авторизації, токенів, userinfo (/api/userinfo) та JWKS. Значення має відповідати полю issuer у цьому документі. У userinfo Casdoor поле preferred_username є іменем користувача, а поле name — відображуваним ім'ям.
For the default situation of Spring Security, the <Redirect URL> should be like http://<Your Spring Boot Application Endpoint>/<Servlet Prefix if it is configured>/login/oauth2/code/casdoor, where casdoor is the registration ID.
For example, in the following demo, the redirect URL should be http://localhost:8080/login/oauth2/code/casdoor.
Це також слід налаштувати в застосунку casdoor.
You can also customize the settings using ClientRegistration in your code. You can find the mapping here.
Крок 4: Початок роботи з демо
-
Ми можемо створити застосунок Spring Boot.
-
We can add a configuration that protects all endpoints except
/and/login**for users to log in. Spring Security 6 removedWebSecurityConfigurerAdapter, so declare aSecurityFilterChainbean:@Configuration
@EnableWebSecurity
public class UiSecurityConfig {
@Bean
SecurityFilterChain securityFilterChain(HttpSecurity http) throws Exception {
http
.authorizeHttpRequests(auth -> auth
.requestMatchers("/", "/login**").permitAll()
.anyRequest().authenticated())
.oauth2Login(Customizer.withDefaults());
return http.build();
}
}Для маппінгу ролей, виходу з Casdoor, серверів ресурсів та Spring Cloud Gateway дивіться SSO для Spring Boot з OpenID Connect.
-
Ми можемо додати просту сторінку для входу користувача.
<!DOCTYPE html>
<html lang="en">
<head>
<meta http-equiv="Content-Type" content="text/html; charset=utf-8" />
<title>Spring OAuth Client Thymeleaf - 1</title>
<link rel="stylesheet"
    href="https://stackpath.bootstrapcdn.com/bootstrap/4.1.3/css/bootstrap.min.css" />
</head>
<body>
    <nav
        class="navbar navbar-expand-lg navbar-light bg-light shadow-sm p-3 mb-5">
        <a class="navbar-brand" th:href="@{/foos/}">Spring OAuth Client
            Thymeleaf - 1</a>
    </nav>
    <div class="container">
        <label>Welcome!</label> <br /> <a th:href="@{/foos/}"
            class="btn btn-primary">Login</a>
    </div>
</body>
</html>
Коли користувач натискає кнопку
login, його перенаправляють наcasdoor. -
Далі ми можемо визначити наші захищені ресурси. Ми можемо опублікувати кінцеву точку
/foosта веб-сторінку для відображення.Модель даних
public class FooModel {
    private Long id;
    private String name;

    public FooModel(Long id, String name) {
        super();
        this.id = id;
        this.name = name;
    }
    public Long getId() {
        return id;
    }
    public void setId(Long id) {
        this.id = id;
    }
    public String getName() {
        return name;
    }
    public void setName(String name) {
        this.name = name;
    }
}
Контролер
@Controller
public class FooClientController {
    @GetMapping("/foos")
    public String getFoos(Model model) {
        List<FooModel> foos = new ArrayList<>();
        foos.add(new FooModel(1L, "a"));
        foos.add(new FooModel(2L, "b"));
        foos.add(new FooModel(3L, "c"));
        model.addAttribute("foos", foos);
        return "foos";
    }
}
Веб-сторінка
<!DOCTYPE html>
<html lang="en">
<head>
<meta http-equiv="Content-Type" content="text/html; charset=utf-8" />
<title>Spring OAuth Client Thymeleaf - 1</title>
<link rel="stylesheet"
href="https://stackpath.bootstrapcdn.com/bootstrap/4.1.3/css/bootstrap.min.css" />
</head>
<body>
<nav
class="navbar navbar-expand-lg navbar-light bg-light shadow-sm p-3 mb-5">
<a class="navbar-brand" th:href="@{/foos/}">Spring OAuth Client
Thymeleaf -1</a>
<ul class="navbar-nav ml-auto">
<li class="navbar-text">Hi, <span sec:authentication="name">preferred_username</span> </li>
</ul>
</nav>
<div class="container">
<h1>All Foos:</h1>
<table class="table table-bordered table-striped">
<thead>
<tr>
<td>ID</td>
<td>Name</td>
</tr>
</thead>
<tbody>
<tr th:if="${foos.empty}">
<td colspan="4">No foos</td>
</tr>
<tr th:each="foo : ${foos}">
<td>
<span th:text="${foo.id}">ID</span>
</td>
<td>
<span th:text="${foo.name}">Name</span>
</td>
</tr>
</tbody>
</table>
</div>
</body>
</html>
Усі шаблони веб-сторінок мають розміщуватися в папці resources/templates.
Крок 5: Спробуйте демо!
Відкрийте /foos у браузері; вас перенаправить на сторінку входу Casdoor. Увійдіть там або з головної сторінки.
Якщо ви відвідаєте головну сторінку, ви побачите налаштування застосунку Casdoor.

Натисніть кнопку login, і сторінка перенаправить вас на сторінку входу Casdoor.

Після входу сторінка перенаправить вас на /foos.
