Nginx community edition
前提条件
こ��のガイドは、以下の条件を満たしていることを前提としています:
- 実行中のCasdoorサービス。 If you haven't installed Casdoor service yet, see Server installation or Try with Docker.
- コンパイル時に
ngx_http_auth_request_moduleモジュールが有効になっているNginxオープンソース版。 See the Nginx auth_request module to enable it. - 認証を有効にしたいウェブサイトがNginx上に正常にデプロイされ、設定されたドメイン名(IPアドレスの使用ではない)でアクセスできる状態であること。
- OAuth2-Proxy (choose one of the two popular options on GitHub):
- oauth2-proxy/oauth2-proxy(この記事で使用)GitHub または Official-Website
- vouch/vouch-proxy GitHub
I. Casdoorの設定
Note: The Casdoor GUI may differ by version; use this article as a reference and adapt to your build.
注記: この記事で言及されているキー、パスワード、ユーザー名、その他の機密情報はすべて例です。 セキュリティ上の理由から、デプロイ時にはそれらを自分の関連する内容に置き換える必要があります。
-
Casdoor管理アカウントにログインします。
-
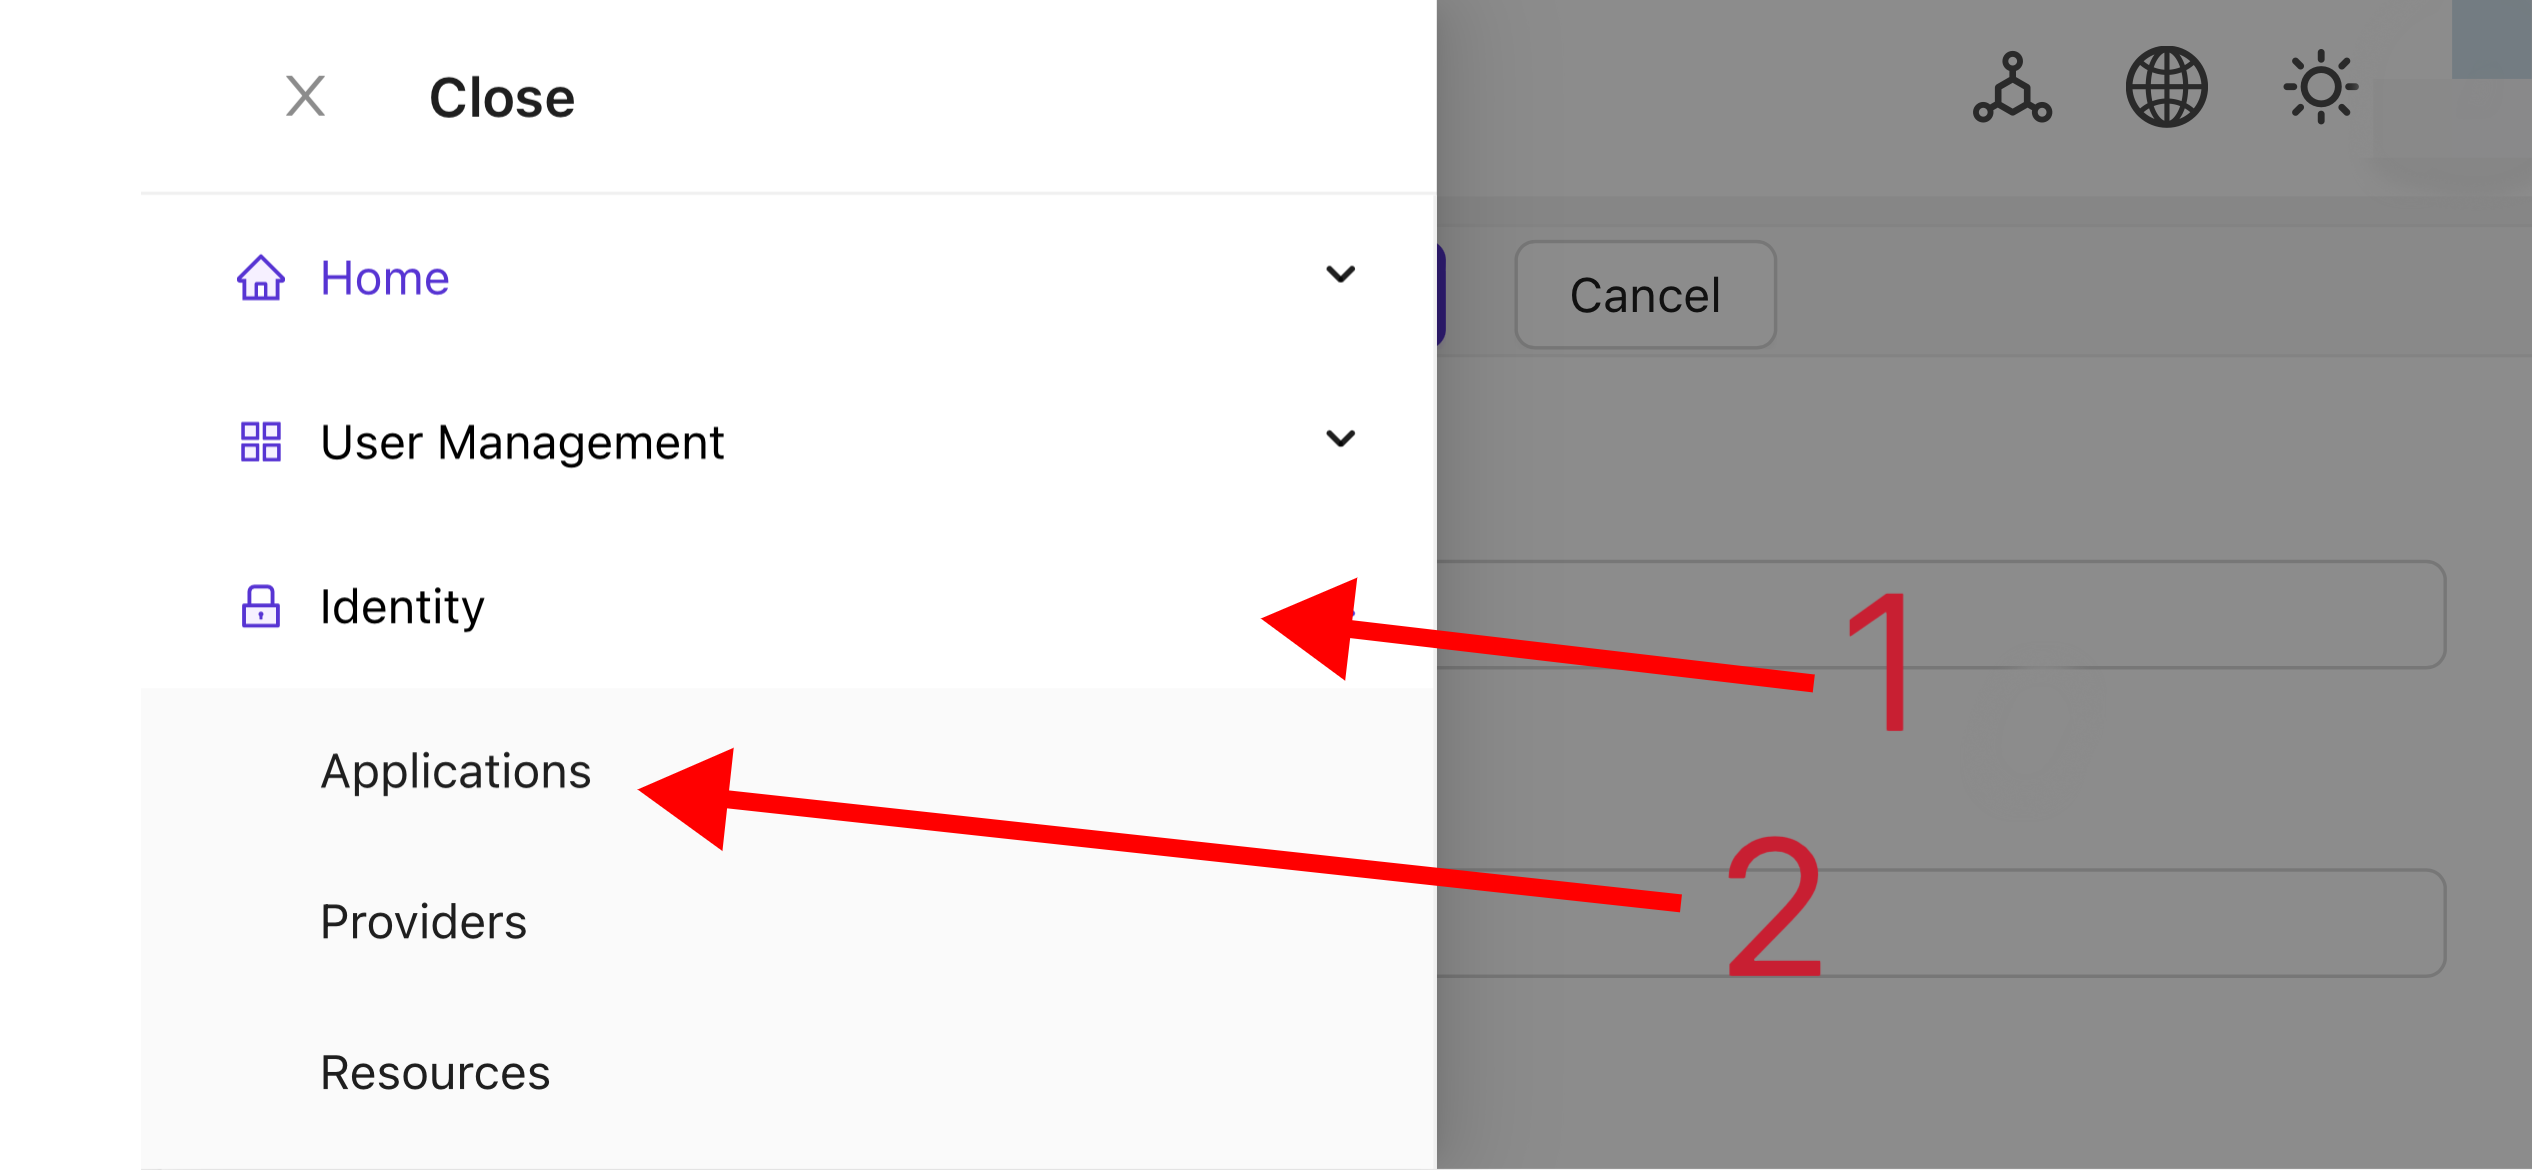
トップバーで「Identity Authentication」>「Applications」を選択し、「Applications」ページで「Add」をクリックします。
-
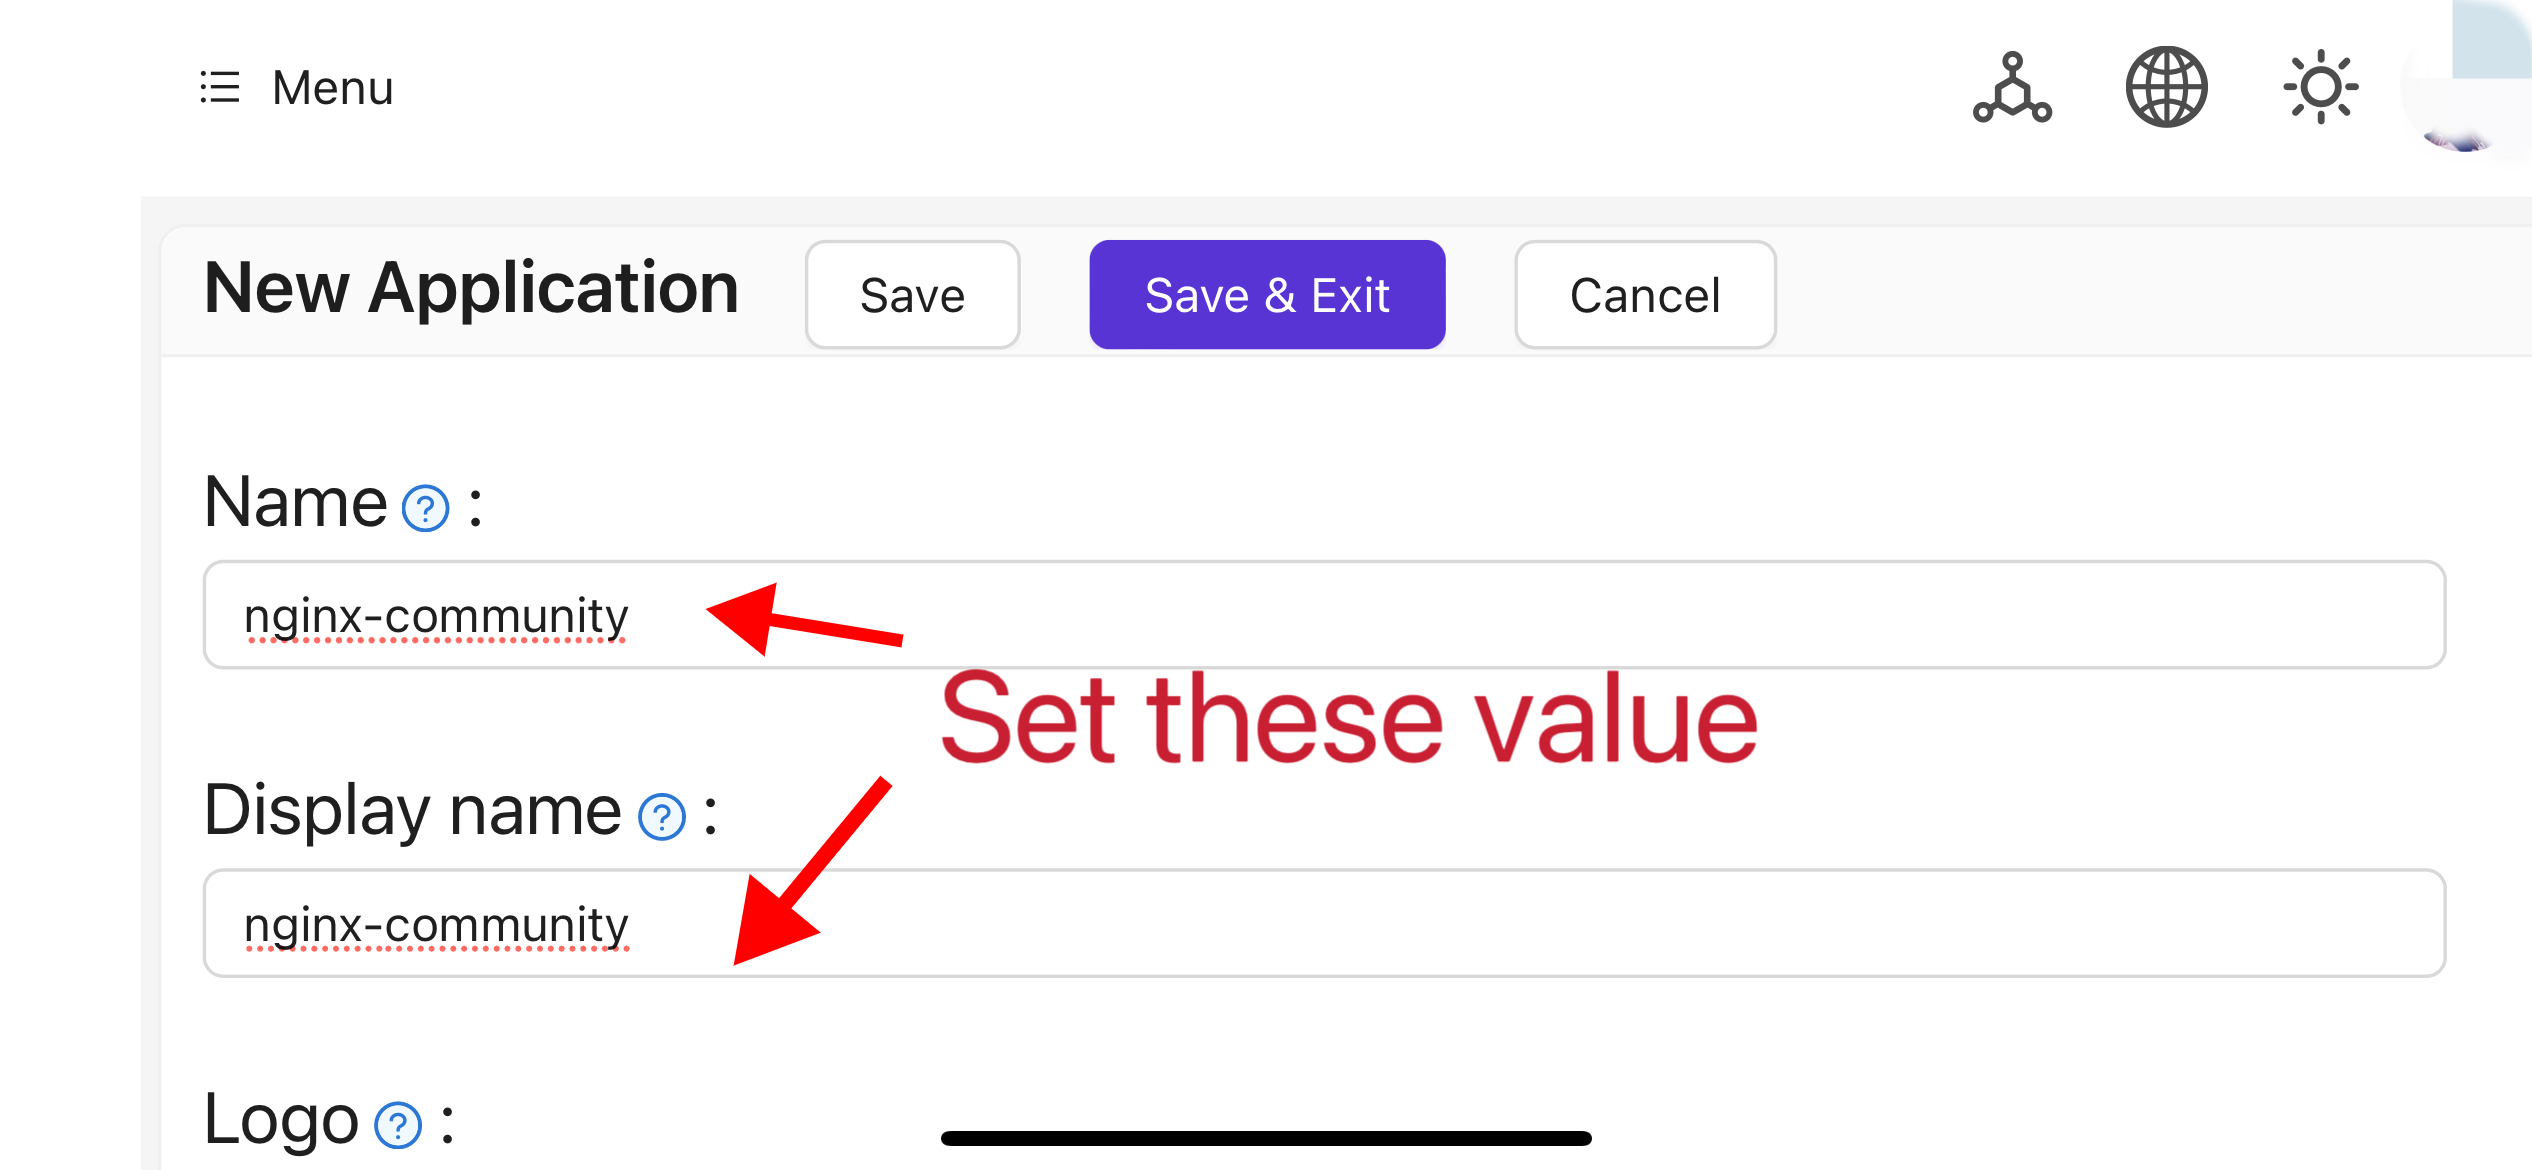
プロジェクト情報に基づいてアプリケーション設定を完了します。 この記事では、「Nginx-Community」という例のアプリケーション名を使用します。
-
「Client ID」と「Client Secret」フィールドの値をメモしてください。 これらは後でOAuth2-Proxyを設定する際に使用されます。 次に、「Redirect URL」を
https://project.yourdomain.com/oauth2/callback/として設定します。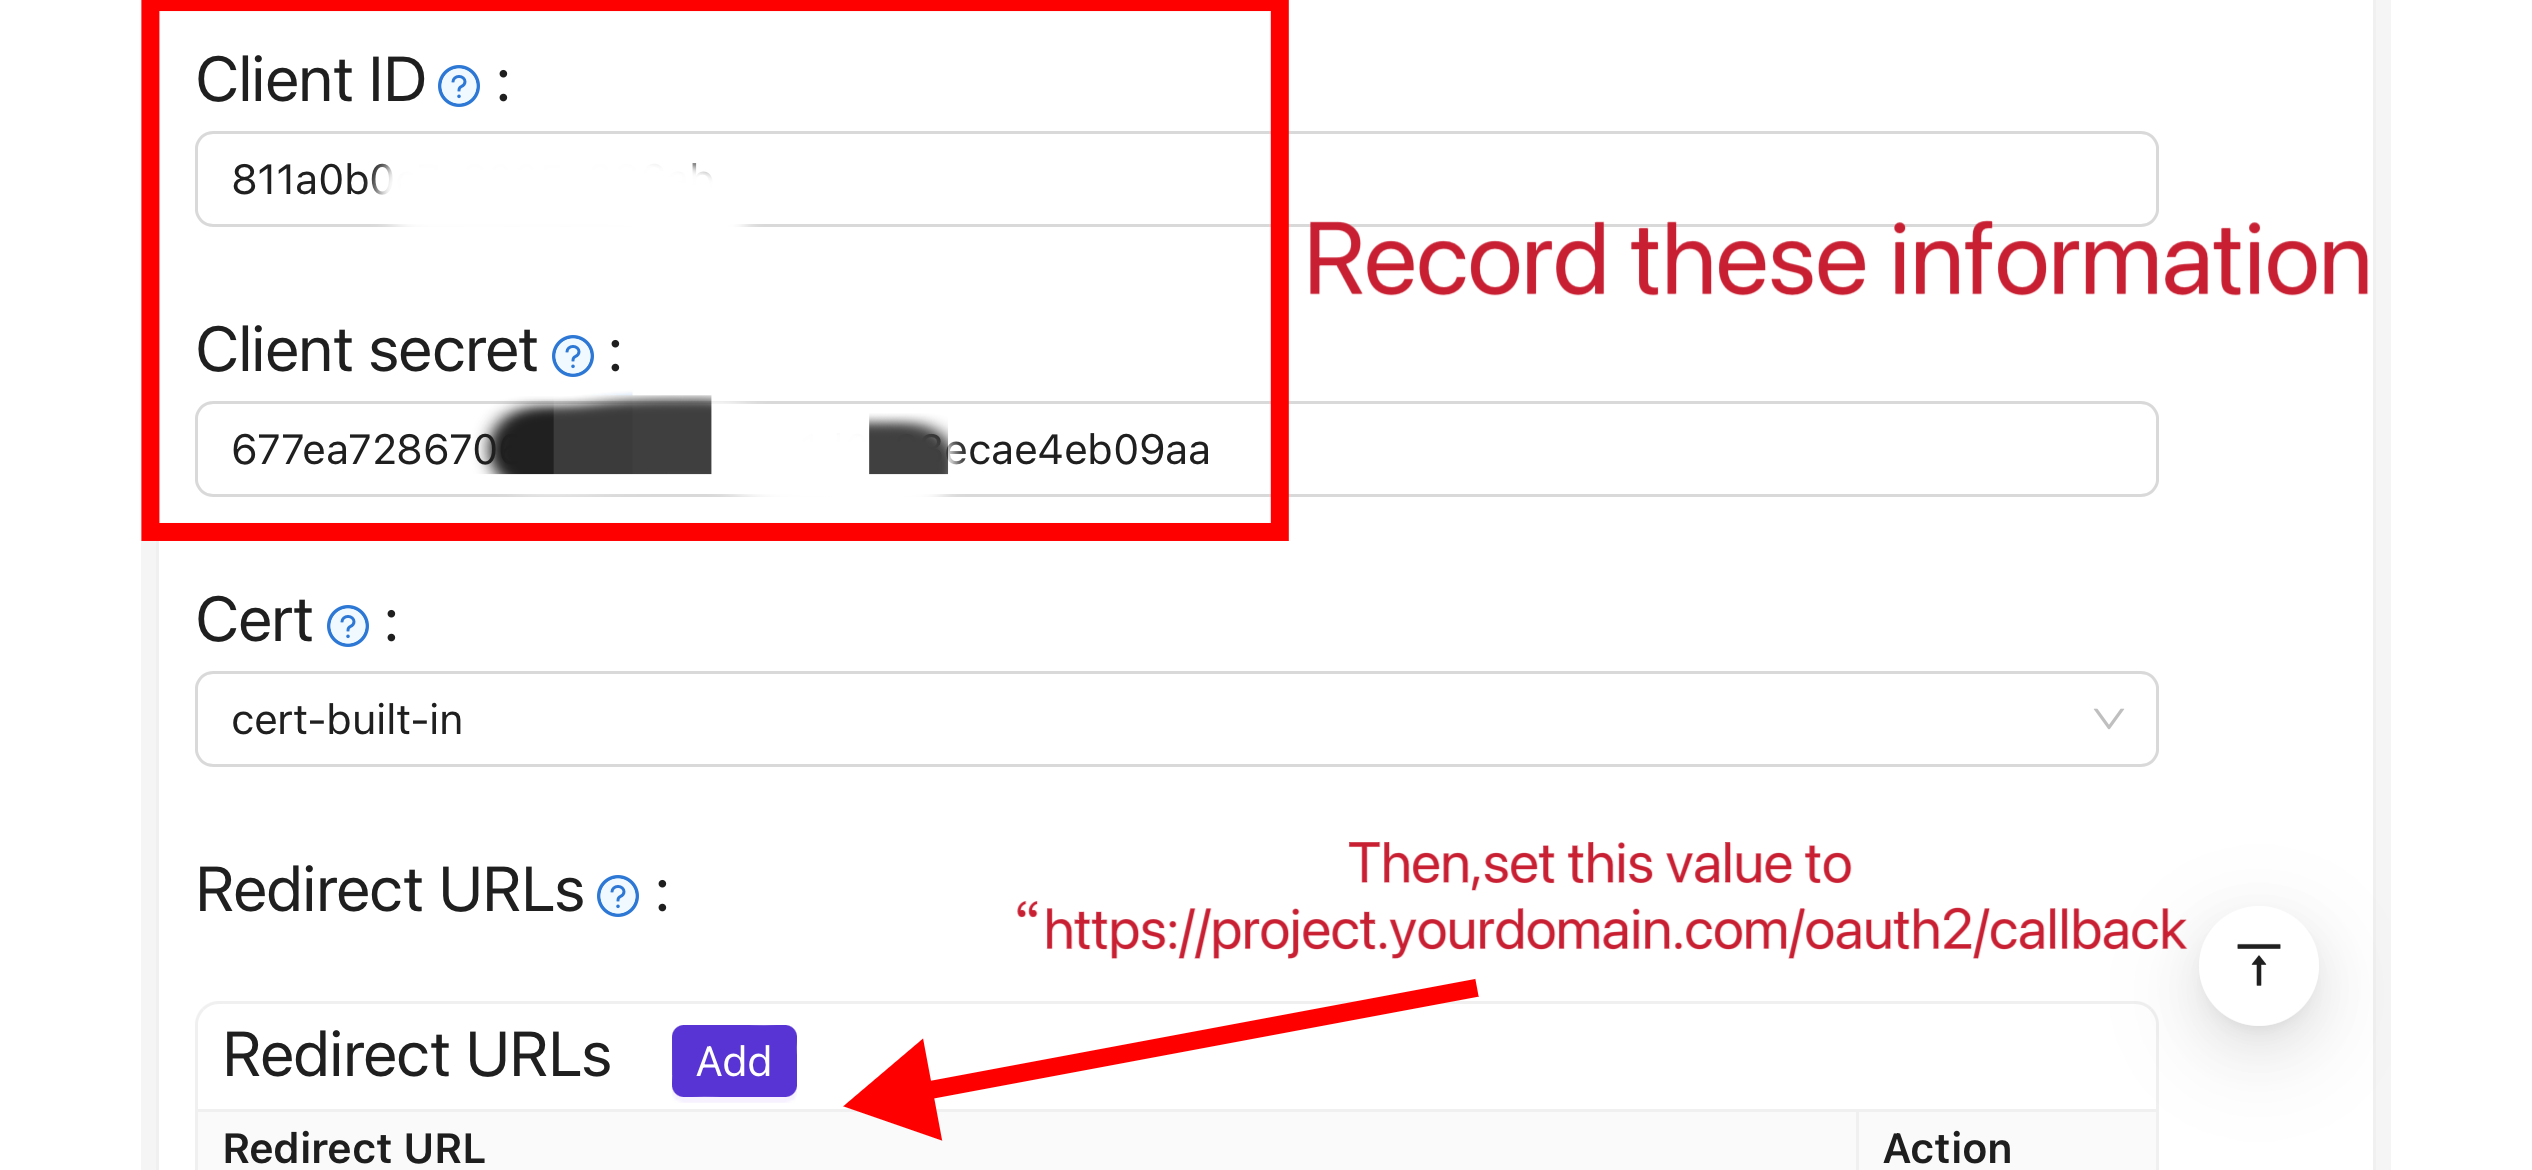
-
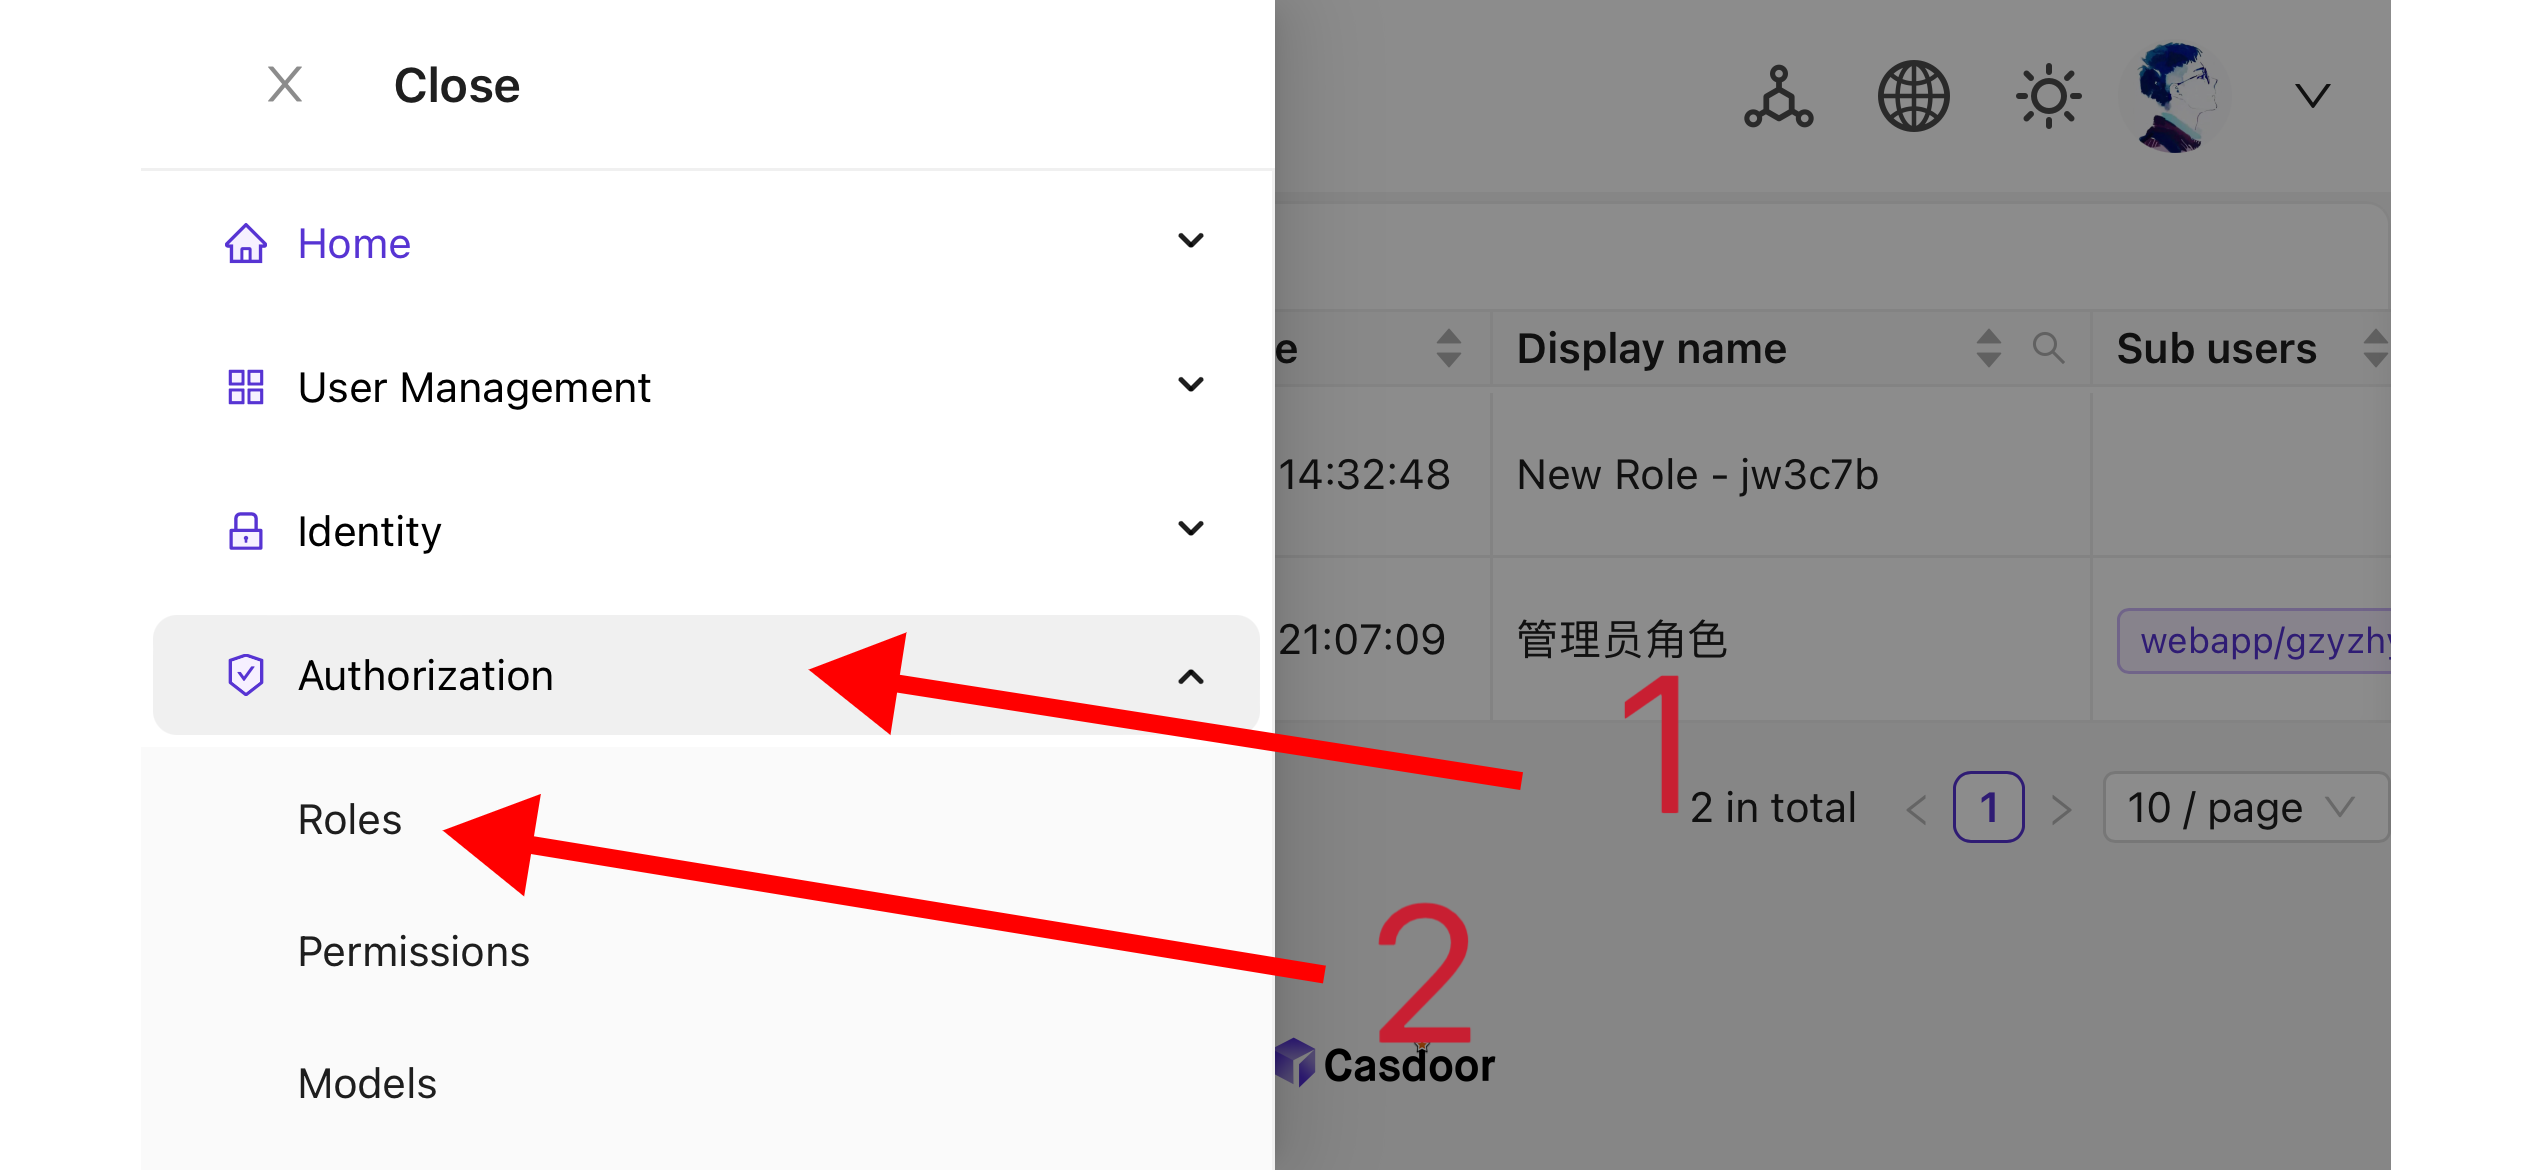
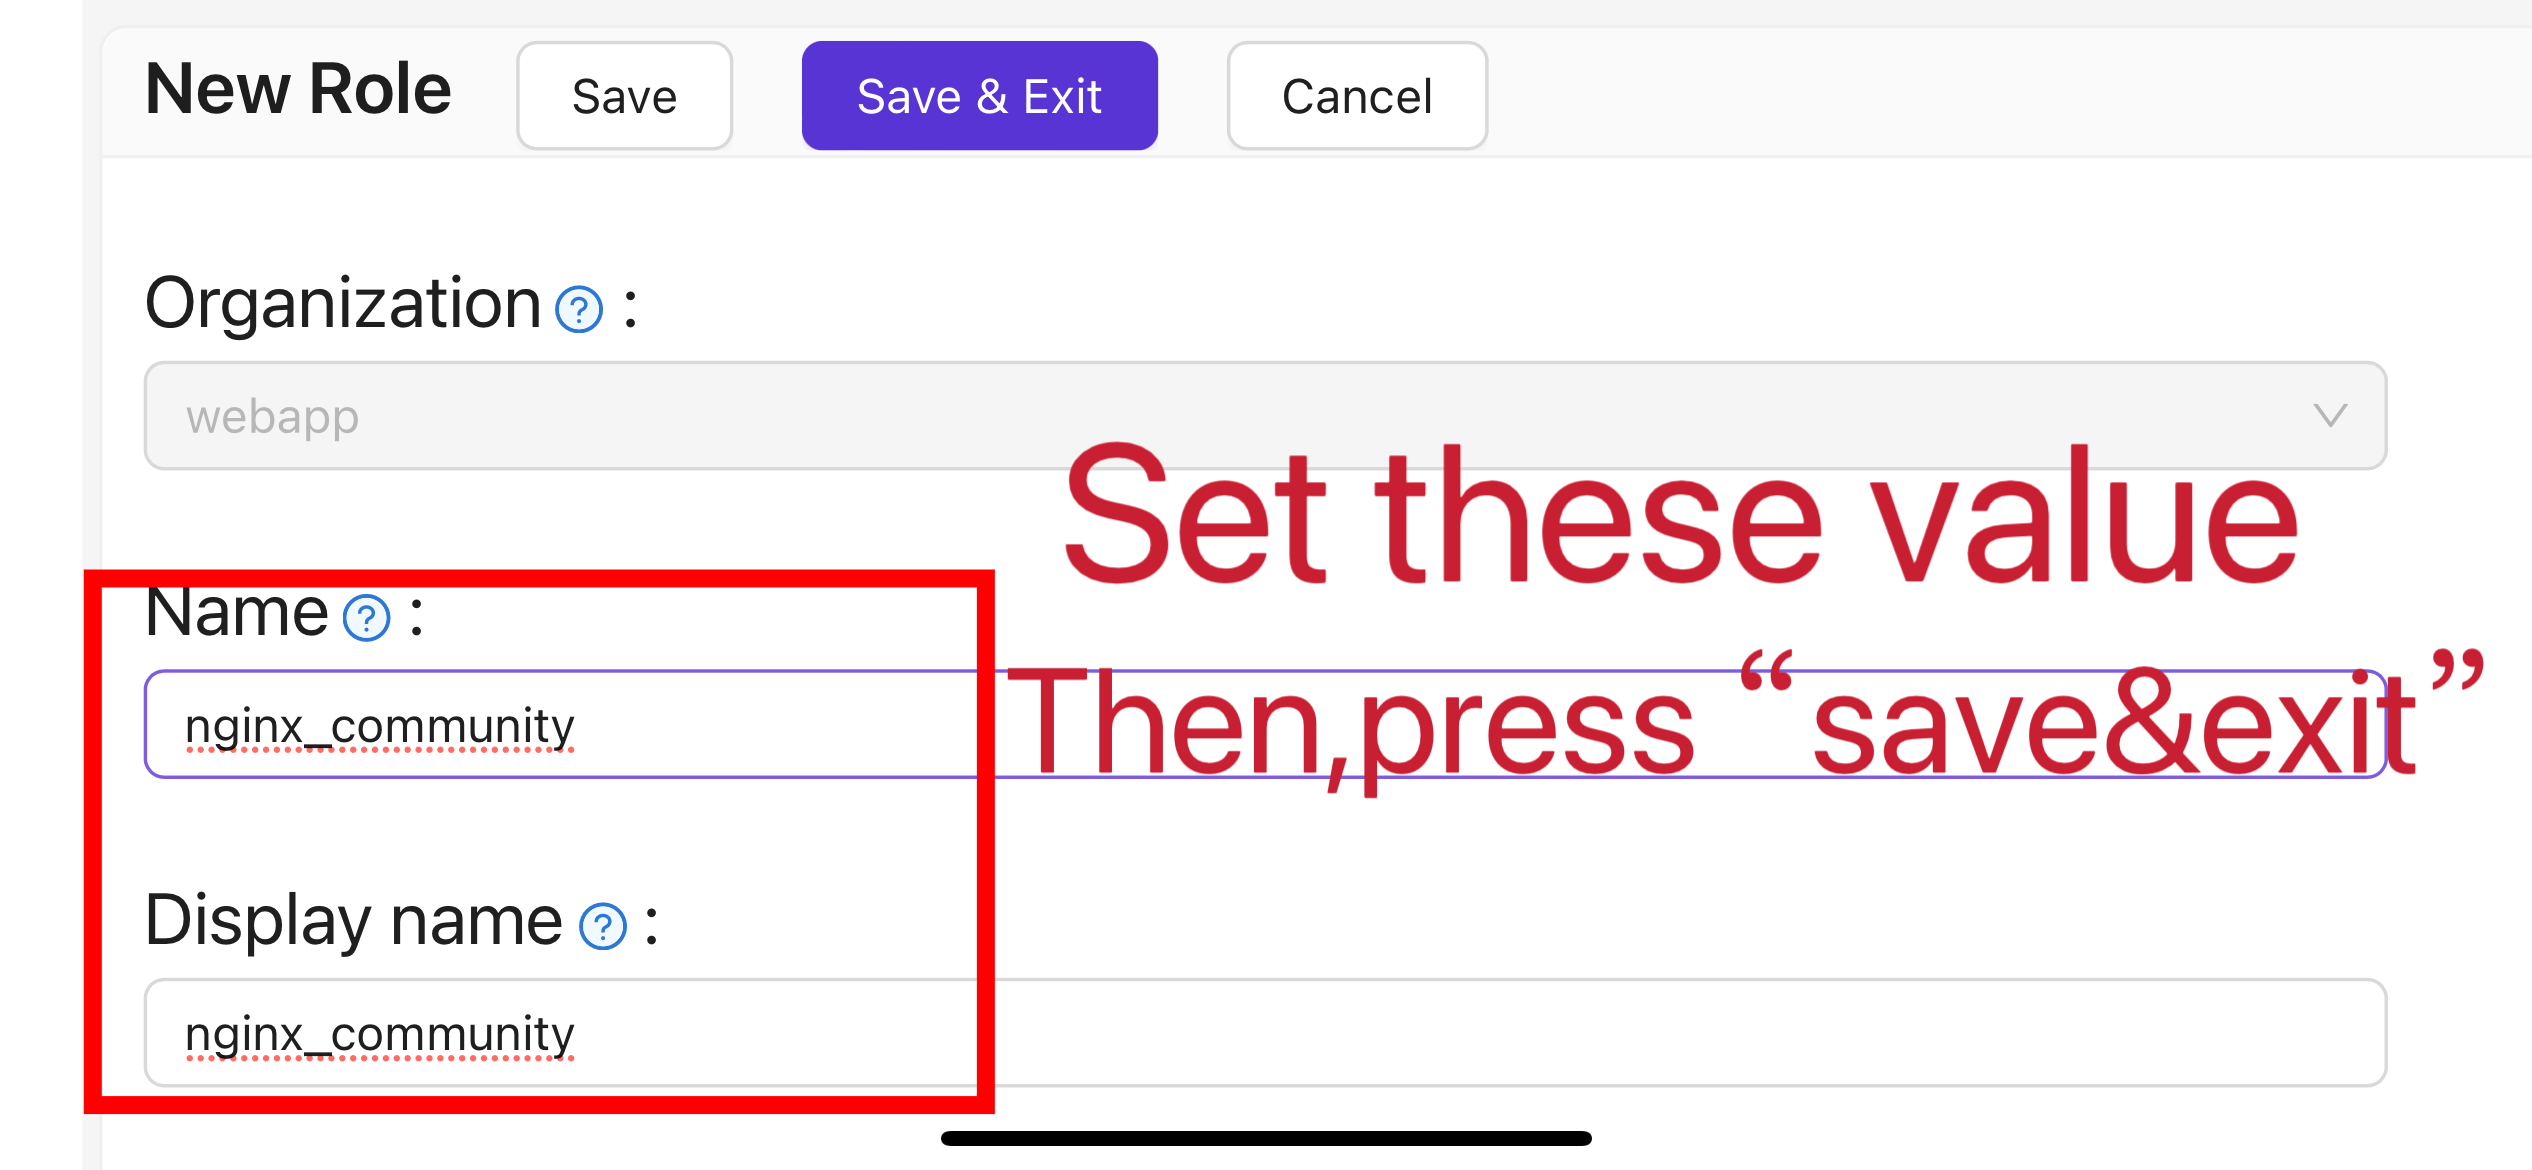
トップバーで「Casbin Permission Management」>「Roles」を選択し、「Roles」ページで「Add」をクリックします。
-
プロジェクト情報に基づいてロール設定を完了します。 この記事では、「nginx_role」という例のロール名を使用します。
-
(オプション)トップバーで「User Management」>「Users」を選択し、必要に応じて新しいユーザーを追加します。 If the users already exist, skip this step. この記事では、「user」という例のユーザーを作成します。
-
Go back to the "Roles" page mentioned in step 5, edit the
nginx_rolerole, and add the required users to Included Users (e.g. the previously createdbuiltin/user).
II. Oauth2-Proxyの設定
Note: For Vouch instead of OAuth2-Proxy, see vouch-proxy on GitHub.
Note: This guide assumes HTTPS (or HTTP→HTTPS redirect). For HTTP-only deployment, adjust the commands and see OAuth2-Proxy docs.
Tips: OAuth2-Proxy は、ソースコードのコンパイル、Dockerインストールなど、さまざまなデプロイ方法を提供しています。 説明を簡単にするために、この記事では「プリビルドバイナリ」をデプロイに使用しています。
-
GitHub Releases ページにアクセスし、お使いのオペレーティングシステムとCPUアーキテクチャに対応するバイナリパッケージをダウンロードします。 2024年1月1日現在、OAuth-Proxyの最新リリースバージョンは
V7.5.1です。 To download the binary for this version on Linux AMD64, run:wget -O oauth2-proxy-linux.tar.gz https://github.com/oauth2-proxy/oauth2-proxy/releases/download/v7.5.1/oauth2-proxy-v7.5.1.linux-amd64.tar.gz圧縮パッケージをダウンロードした後、GitHub Releases ページで公式サイトが提供する
SHA256SUM値をチェックし、ダウンロードしたパッケージのSHA256SUM値と文字ごとに比較することを強くお勧めします。 -
ダウンロードしたパッケージを展開します:
tar -zxvf oauth2-proxy-*.tar.gz -
展開したディレクトリに入ります:
cd oauth2-proxy-v7.5.1.linux-amd64 -
取得したバイナリファイルを
/usr/local/binに移動し、実行可能な権限を設定します。 状況に応じてsudoを使用して権限を昇格する必要があるかもしれません。cp ./oauth2-proxy /usr/local/bin
cd /usr/local/bin
chmod +x ./oauth2-proxy -
バイナリインストールをテストします。 インストールが成功した場合、次のコマンドを実行した後、
oauth2-proxy v7.5.1 (built with go1.21.1)と似た出力が表示されるはずです。cd ~
oauth2-proxy --version -
コマンドラインパラメータを使用してoauth2-proxyを実行します。 [required] とマークされたパラメータは、特定の状況に応じて設定する必要がありますが、[optional] とマークされたパラメータはパフォーマンスを最適化することができますが、省略することもできます。 To run oauth2-proxy in the background, use a process manager such as
Screen,Supervisor, or a terminal multiplexer.oauth2-proxy \
--provider=oidc \ #[required] Do not change
--client-id=abc123456def \ #[required] "Client ID" obtained in step I.4 above
--client-secret=abc123456def \ #[required] "Client Secret" obtained in step I.4 above
--oidc-issuer-url=https://auth.yourdomain.com \ #[required] Your Casdoor URL (domain name or public IP)
--redirect-url=https://project.yourdomain.com/oauth2/callback \ #[required] https://domain-of-the-project-to-protect/oauth2/callback
--scope=email+profile+groups+openid \ #[required] Obtained from Casdoor: user email, user profile, groups, and login authentication
--cookie-domain=project.yourdomain.com \ #[required] Domain name of the project you want to protect
--whitelist-domain=project.yourdomain.com \ #[required] Domain name of the project you want to protect
--cookie-secret=abc123456def \ #[required] Use a random string (letters and numbers)
--email-domain=* \ #[required] List of acceptable user email domains (* means accept all domains). If the user's email suffix is not in this list, a 403 error will be returned even if the login is successful.
--insecure-oidc-allow-unverified-email=true \ #[required] Whether to accept users with unverified email addresses
--http-address=http://127.0.0.1:65534 \ #[required] Address oauth2-proxy listens on; note this for the Nginx config later.
--cookie-expire=24h0m0s \ #[optional] Cookie expiration time. After this period, users will need to log in again.
--custom-sign-in-logo=https://cdn.yourdomain.com/pic/proj.png \ #[optional] Icon displayed on the login page. It is recommended to use a rectangular image rather than a square one.
--session-store-type=redis \ #[optional] Use Redis cache. Omit if not using Redis.
--redis-connection-url=redis://127.0.0.1:6379/0 \ #[optional] Redis URL. Omit if not using Redis.
--redis-password=123456 #[optional] Redis password. Omit if not using Redis or if Redis has no password.
III. Nginxの設定
Note: If building Nginx from source, ensure ngx_http_auth_request_module is enabled (add --with_http_auth_request_module). See the Nginx auth_request module.
Tips: 宝塔パネルツールを使用してインストールされたNginxは、このモジュールをデフォルトで有効にしていません。
-
保護したい既にデプロイされているウェブサイトの設定ファイルを開き、以下の変更を加えます:
Note: Adjust the config for your setup; Nginx version and environment may require changes.
server {
    listen 443 ssl http2;

    include /path/to/ssl.conf;

    # Add the following content
    location ^~ /oauth2/ {
        proxy_pass       http://127.0.0.1:65534; # Change this to the "--http-address" configured in step II.6

        proxy_set_header Host                    $host;
        proxy_set_header X-Real-IP               $remote_addr;
        proxy_set_header X-Scheme                $scheme;

        proxy_set_header X-Auth-Request-Redirect $request_uri;
        # or, if you are handling multiple domains:
        # proxy_set_header X-Auth-Request-Redirect $scheme://$host$request_uri;
    }
    location = /oauth2/auth {
        proxy_pass       http://127.0.0.1:65534; # Change this to the "--http-address" configured in step II.6

        proxy_set_header Host             $host;
        proxy_set_header X-Real-IP        $remote_addr;
        proxy_set_header X-Scheme         $scheme;
        proxy_set_header Content-Length   "";
        proxy_pass_request_body           off;
    }
    location ^~ / {
        auth_request /oauth2/auth;
        error_page 401 = /oauth2/sign_in;

        auth_request_set $user   $upstream_http_x_auth_request_user;
        auth_request_set $email  $upstream_http_x_auth_request_email;
        proxy_set_header X-User  $user; # Pass the username of the user logged in to your backend service
        proxy_set_header X-Email $email; # Pass the email of the user logged in to your backend service

        auth_request_set $token  $upstream_http_x_auth_request_access_token;
        proxy_set_header X-Access-Token $token; # Pass the user's login token to your backend service

        # The following configurations are related to cookie validation for user login
        auth_request_set $auth_cookie $upstream_http_set_cookie;
        add_header Set-Cookie $auth_cookie;

        auth_request_set $auth_cookie_name_upstream_1 $upstream_cookie_auth_cookie_name_1;

        if ($auth_cookie ~* "(; .*)") {
            set $auth_cookie_name_0 $auth_cookie;
            set $auth_cookie_name_1 "auth_cookie_name_1=$auth_cookie_name_upstream_1$1";
        }

        if ($auth_cookie_name_upstream_1) {
            add_header Set-Cookie $auth_cookie_name_0;
            add_header Set-Cookie $auth_cookie_name_1;
        }
        proxy_no_cache $cookie_session;

        # Provide the web page to the user after successful validation

        proxy_pass http://127.0.0.1:8080; # The address where your backend service runs
        # Note: This is not the Casdoor deployment address or the Oauth2-Proxy running address, but the address where your backend service that needs login protection runs.

        # Then add configurations to pass user IP, Connection request headers, etc., to your backend service, for example:
        proxy_set_header X-Forwarded-For $remote_addr;
        proxy_http_version 1.1;
        proxy_set_header Upgrade $http_upgrade;
        proxy_set_header Connection upgrade;
        proxy_set_header Accept-Encoding gzip;
    }
    access_log /path/to/access_log.log;
    error_log /path/to/error_log.log;
} -
ファイルを保存し、Nginxをリロードします。
テスト
- Next, test your implementation.
- 通常の状況では、ユーザーはサービスにログインする際に以下のプロセスを経ます:
- ブラウザでURL
project.yourdomain.comを開く -> ログインが必要なページのみが表示され、「OpenID Connectでサインイン」というボタンが含まれている -> ボタンをクリックし、Casdoorのアドレスにリダイレクトされ、ログインを求められる -> ユーザーはユーザー名とパスワードを入力し、Casdoorが資格情報を検証する -> 自動的にURLproject.yourdomain.comにリダイレクトされる -> サービスに正常にアクセスする -> 設定した--cookie-expire時間が経過すると、ユーザーは再度ログインを求められる。
トラブルシューティング
- If it does not run as expected, check your Nginx and OAuth2-Proxy configuration.
- See OAuth2-Proxy documentation.
- To suggest fixes for this doc, open an issue or PR on GitHub.