OAuth 2.0
Casdoor is an OAuth 2.0 authorization server. This page describes how to get an access token with each grant type, how to verify a token, and how to use it. If you prefer not to call the endpoints yourself, use a Casdoor SDK or a standard OIDC client.
Endpoints
| Endpoint | URL |
|---|---|
| Authorization | https://<casdoor-host>/login/oauth/authorize |
| Token | https://<casdoor-host>/api/login/oauth/access_token |
| Refresh token | https://<casdoor-host>/api/login/oauth/refresh_token |
| Token introspection | https://<casdoor-host>/api/login/oauth/introspect |
| UserInfo | https://<casdoor-host>/api/userinfo |
In the examples, ClientId and ClientSecret are the Client ID and the Client secret of the Casdoor application.
Supported grant types
| Grant Type | RFC | Use Case |
|---|---|---|
| Authorization Code | RFC 6749 §4.1 | Default; web/mobile apps with a backend. Enabled by default. |
| Implicit | RFC 6749 §4.2 | Frontend-only apps without a backend. |
| Resource Owner Password | RFC 6749 §4.3 | Apps with no frontend redirect; user credentials sent directly. |
| Client Credentials | RFC 6749 §4.4 | Service-to-service calls with no user involved. |
| Refresh Token | RFC 6749 §6 | Renew an access token without re-authenticating. |
| Device Authorization | RFC 8628 | Devices with limited input or no browser. |
| Token Exchange | RFC 8693 | Swap an existing token for one with different scope or audience. |
| JWT Bearer | RFC 7523 | Service auth using a signed JWT assertion instead of a client secret. |
| Verification Code | Casdoor extension | Native apps that sign users in (and up) with a code sent by SMS or email. |
The authorization code grant is on by default. Turn on the other grant types in Grant types on the edit page of the application.
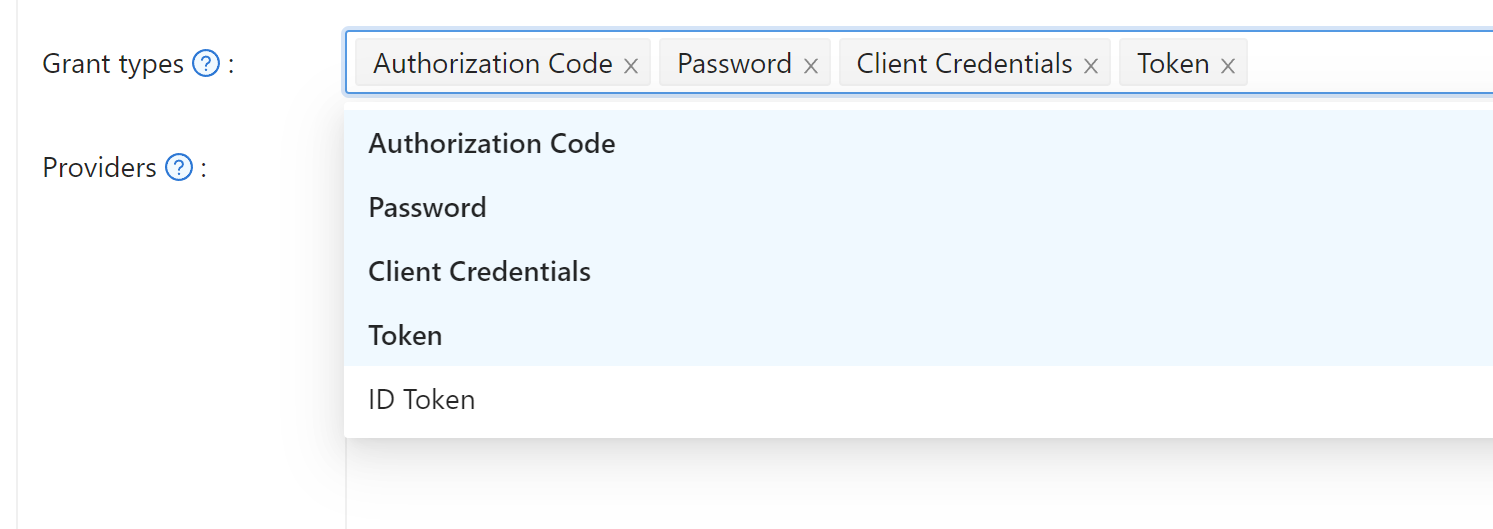
Authorization code grant
Use this grant for applications that sign users in through the browser. It is the recommended grant.
-
Redirect the user to the authorization endpoint:
https://<CASDOOR_HOST>/login/oauth/authorize?
client_id=CLIENT_ID&
redirect_uri=REDIRECT_URI&
response_type=code&
scope=openid&
state=STATE -
The user signs in. Casdoor redirects the browser to your redirect URL with an authorization code:
https://REDIRECT_URI?code=CODE&state=STATE -
Exchange the code for tokens. Send a
POSTrequest to the token endpoint:https://<CASDOOR_HOST>/api/login/oauth/access_tokenWith the body:
{
    "grant_type": "authorization_code",
    "client_id": ClientId,
    "client_secret": ClientSecret,
    "code": Code,
} -
Read the tokens from the response:
{
    "access_token": "eyJhb...",
    "id_token": "eyJhb...",
    "refresh_token": "eyJhb...",
    "token_type": "Bearer",
    "expires_in": 10080,
    "scope": "openid"
}
Scopes
Request scopes with the scope parameter of the authorization URL. They determine which user fields the tokens and the UserInfo endpoint return.
| Scope | Description |
|---|---|
| openid (default) | sub, iss, aud |
| profile | name, displayName, avatar |
| email address | |
| address | address (OIDC object in JWT-Standard; see OIDC address claim) |
| phone | phone number |
Separate several scopes with %20:
https://<CASDOOR_HOST>/login/oauth/authorize?
client_id=...&
scope=openid%20email
For the claims behind each scope, see the OpenID Connect specification.
PKCE
Casdoor supports Proof Key for Code Exchange (PKCE), which protects the authorization code of public clients such as mobile and single-page applications.
-
Generate a random code verifier of 43 to 128 characters.
-
Compute the code challenge: the Base64-URL-encoded SHA-256 hash of the verifier.
-
Add two parameters to the authorization URL:
&code_challenge_method=S256&code_challenge=YOUR_CHALLENGE -
Add the
code_verifierparameter, with the original verifier, to the token request.
With PKCE, client_secret is optional in the token request. If you send it, it must be correct.
When Casdoor itself signs users in at an external OAuth provider that requires PKCE, such as Twitter or a custom provider with PKCE turned on, Casdoor generates the code verifier for each flow. You don't implement PKCE for that part.
Bind a token to one service
If your application calls several backend services, you can bind a token to one of them, so that a token that was issued for one service can't be used at another. Casdoor supports Resource Indicators (RFC 8707) for this.
-
Add the
resourceparameter, with an absolute URI that identifies the service, to the authorization URL:https://<CASDOOR_HOST>/login/oauth/authorize?
client_id=CLIENT_ID&
redirect_uri=REDIRECT_URI&
response_type=code&
scope=openid&
state=STATE&
resource=https://api.example.com -
Send the same
resourcein the token request:{
"grant_type": "authorization_code",
"client_id": ClientId,
"client_secret": ClientSecret,
"code": Code,
"resource": "https://api.example.com"
}
The aud (audience) claim of the access token is then the resource URI and not the client ID. The service verifies that a token was issued for it by checking aud. The value of resource must be exactly the same in both requests.
Casdoor carries the resource parameter through interactive sign-in. If the user has to enter a password, complete multi-factor authentication (MFA), or use WebAuthn, the parameter survives the redirects.
Skip the sign-in page with a provider hint
To send the user straight to one OAuth provider, without showing the Casdoor sign-in page, add provider_hint=<provider-name> to the authorization URL:
https://<CASDOOR_HOST>/login/oauth/authorize?
client_id=CLIENT_ID&
redirect_uri=REDIRECT_URI&
response_type=code&
scope=openid&
state=STATE&
provider_hint=github
Casdoor then serves a small redirect page, without loading the full frontend, and sends the user to the provider. This shortens the time to the redirect on slow devices and connections.
Sign-up in the authorization flow
A user who creates an account during the authorization flow is redirected to your redirect URL with an authorization code as soon as the sign-up completes, exactly as after a sign-in. Casdoor carries the authorization parameters, such as client_id, response_type, and redirect_uri, through the sign-up. Your application needs no changes for this.
Implicit grant
Use this grant only for applications without a backend. Prefer the authorization code grant with PKCE.
-
Turn on the implicit grant in Grant types of the application.
-
Redirect the user to:
https://<CASDOOR_HOST>/login/oauth/authorize?client_id=CLIENT_ID&redirect_uri=REDIRECT_URI&response_type=token&scope=openid&state=STATE -
After the user signs in, Casdoor redirects the browser to:
https://REDIRECT_URI/#access_token=ACCESS_TOKEN
Casdoor also supports id_token as response_type.
The implicit grant requires a user with a username and a password. Users who were created only through an external provider and have no local password can't use it and receive invalid_grant. Use the authorization code grant for them.
Device grant
Use this grant for devices with limited input or without a browser, such as smart TVs and CLI tools.
- Turn on the device grant in Grant types of the application.
- Send a request to the
device_authorization_endpointfrom the discovery document. - Show the
verification_urifrom the response to the user, as text or as a QR code. - The user opens the URL on another device, enters the user code, and signs in. Casdoor provides the page behind
verification_uri, so you don't build a UI for it. - Meanwhile, the device polls the token endpoint with its
device_codeuntil the user has signed in. See RFC 8628, section 3.4.
You can also offer device login as a sign-in method in the Signin methods table of the application.
Let users sign in to your website by scanning a QR code
The same flow lets users who are signed in to your native app sign in to your website by scanning a QR code with the app.
- In the Casdoor admin console, add Device login to the Signin methods of the application, with the rule Login page.
- Turn on Device Code in Grant types.
The sign-in page now shows a QR code next to the form and completes the sign-in on its own once the QR code is approved.
The QR code contains the verification_uri, for example https://<casdoor-host>/login/oauth/device/ra91hy?cancelToken=.... A user who scans it with the camera of a phone opens the URL in the browser, signs in, and approves there. Your app can approve it directly instead, with the access token that it already holds:
-
Take the user code from the path of the URL. In the example, it is
ra91hy. -
Show the user what they are about to sign in to.
-
Send a
POSTrequest tohttps://<casdoor-host>/api/loginwith the headerAuthorization: Bearer <access-token>and the body:{
"application": ApplicationName,
"organization": OrganizationName,
"type": "device",
"userCode": "ra91hy"
}
To reject the sign-in, send userCode and the cancelToken from the same URL as query parameters to https://<casdoor-host>/api/cancel-device-auth.
Device grant with several replicas
By default, Casdoor keeps pending device authorization requests, which map device codes to user codes, in memory. With several replicas of Casdoor, the polling request of the device and the confirmation in the browser can reach different replicas, and the flow then fails intermittently.
To share the requests between replicas, set redisEndpoint in conf/app.conf. Casdoor then stores them in Redis. This is the same option that shares sessions, in the format host:port[,db[,password]], and no further option is needed. If Casdoor can't reach Redis at startup, it logs a warning and uses the in-memory store. See the Configuration reference.
Resource owner password credentials grant
Use this grant only when your application can't redirect the user to Casdoor and collects the username and password itself.
-
Turn on the password grant in Grant types of the application.
-
Send a
POSTrequest to the token endpoint:https://<CASDOOR_HOST>/api/login/oauth/access_tokenWith the body:
{
    "grant_type": "password",
    "client_id": ClientId,
    "client_secret": ClientSecret,
    "username": Username,
    "password": Password,
} -
Read the tokens from the response:
{
    "access_token": "eyJhb...",
    "id_token": "eyJhb...",
    "refresh_token": "eyJhb...",
    "token_type": "Bearer",
    "expires_in": 10080,
    "scope": "openid"
}
Verification code grant
Use this grant in native apps that sign users in with a phone number or an email address and a one-time code, without opening a browser. It is an extension grant of Casdoor, as allowed by RFC 6749, section 4.5. If the application allows it, an address that has no account yet is signed up in the same step.
-
Turn on Verification Code in Grant types of the application, and add an SMS provider, an email provider, or both to the application.
-
Send the code. Send a
POSTrequest with form data tohttps://<casdoor-host>/api/send-verification-code:Field Value applicationIdadmin/<APPLICATION_NAME>typephoneoremaildestThe phone number or email countryCodeThe region of a phone number, e.g. CNorUS. Not needed for an E.164 number like+8613800000000methodlogincaptchaTypenone, or the captcha type andcaptchaTokenwhen the application's captcha provider asks for one -
Exchange the code for tokens. Send a
POSTrequest tohttps://<casdoor-host>/api/login/oauth/access_token:{
"grant_type": "urn:casdoor:params:oauth:grant-type:verification-code",
"client_id": ClientId,
"username": "+8613800000000",
"code": "123456",
"scope": "openid profile"
}usernameis the phone number or the email address that the code was sent to. For a phone number in the national format, also sendcountry_code.
The grant needs no client secret, so it works from a public client. The response is the same as for the other grants and contains a refresh_token that keeps the user signed in.
Wrong codes count toward the Failed signin limit of the application. Casdoor refuses users who have MFA enabled. Use the authorization code grant for them.
Sign up new users with a verification code
When no user has the phone number or the email address, the grant creates the user, as the sign-up page would, if all of the following conditions hold:
- Enable signup is on for the application, and Disable self signup is off.
- The Signup items of the application require nothing beyond what the code proves. Only ID, Username, Display name, Password, Confirm password, Agreement, Signup button, and Providers may be required, plus
Emailwhen the user signs up with an email address, orPhonewhen the user signs up with a phone number. The default sign-up items require bothEmailandPhone, so make the other one optional. - For a phone number, its region is in the Supported country codes of the organization.
Otherwise, /api/send-verification-code answers that the user doesn't exist, and only existing users can sign in.
Client credentials grant
Use this grant for machine-to-machine calls, where no user is present.
-
Turn on the client credentials grant in Grant types of the application.
-
Send a
POSTrequest tohttps://<casdoor-host>/api/login/oauth/access_token:{
"grant_type": "client_credentials",
"client_id": ClientId,
"client_secret": ClientSecret,
} -
Read the token from the response:
{
    "access_token": "eyJhb...",
    "id_token": "eyJhb...",
    "refresh_token": "eyJhb...",
    "token_type": "Bearer",
    "expires_in": 10080,
    "scope": "openid"
}
Unlike the tokens of the grants above, this access token belongs to the application and not to a user.
Refresh token grant
Use the refresh token from an earlier response to get a new access token.
-
Set the lifetime of refresh tokens in Refresh token expire of the application. The default is 0 hours.
-
Send a
POSTrequest tohttps://<casdoor-host>/api/login/oauth/refresh_token:{
"grant_type": "refresh_token",
"refresh_token": REFRESH_TOKEN,
"scope": SCOPE,
"client_id": ClientId,
"client_secret": ClientSecret,
} -
Read the tokens from the response:
{
    "access_token": "eyJhb...",
    "id_token": "eyJhb...",
    "refresh_token": "eyJhb...",
    "token_type": "Bearer",
    "expires_in": 10080,
    "scope": "openid"
}
Renaming a user doesn't invalidate the refresh tokens of the user.
Refresh token rotation
By default, every refresh returns a new refresh token and revokes the one that was used, as RFC 9700 recommends for public clients. Store the new refresh token after each refresh. A refresh token that was already used fails with invalid_grant.
Rotation breaks clients in which several processes share one refresh token, for example a CLI that runs parallel jobs with a token from an environment variable: the first refresh revokes the token for all the others. For such clients, turn on Disable refresh token rotation in the OIDC/OAuth settings of the application. Then:
- A refresh returns the same refresh token, which keeps its original expiry.
- The access tokens of earlier refreshes stay valid until they expire.
- Signing out still revokes the refresh token for all processes.
Without rotation, a leaked refresh token works until it expires. Keep Refresh token expire short, and prefer DPoP for public clients.
Token exchange grant
Token Exchange (RFC 8693) swaps a token for a new token with different properties. Use it when one service calls another on behalf of a user, or to narrow the scope of a token before you pass it to a downstream service. For example, an API gateway exchanges a token with a broad scope for a token with a narrow scope before it forwards a request to a microservice, so that each service gets only the permissions that it needs.
Send a POST request to https://<casdoor-host>/api/login/oauth/access_token:
{
    "grant_type": "urn:ietf:params:oauth:grant-type:token-exchange",
    "client_id": ClientId,
    "client_secret": ClientSecret,
    "subject_token": SubjectToken,
    "subject_token_type": "urn:ietf:params:oauth:token-type:access_token",
    "scope": "openid email"
}
| Parameter | Description |
|---|---|
subject_token | The token to exchange, typically an access token or a JSON Web Token (JWT) that you already hold |
subject_token_type | urn:ietf:params:oauth:token-type:access_token (default), urn:ietf:params:oauth:token-type:jwt, or urn:ietf:params:oauth:token-type:id_token |
scope | Optional. A subset of the scope of the subject token. If you omit it, the new token has the scope of the subject token |
The response contains a new token for the same user as the subject token:
{
    "access_token": "eyJhb...",
    "id_token": "eyJhb...",
    "refresh_token": "eyJhb...",
    "token_type": "Bearer",
    "expires_in": 10080,
    "scope": "openid email"
}
Casdoor validates the subject token with the certificate of the application that issued it, which the azp claim identifies, and not with the certificate of the requesting client. If the requesting client isn't the issuer, the aud claim of the subject token must include the client ID of the requesting client. Otherwise, Casdoor rejects the exchange with invalid_grant. This keeps one application from exchanging the tokens of another application without being named as an audience (RFC 8693, section 2.1).
JWT bearer grant
With the JWT bearer grant (RFC 7523), a client gets an access token by presenting a signed JWT assertion instead of a client secret. Use it for service-to-service calls in which the client holds a private key and you don't want to share a long-lived secret.
-
Turn on JWT Bearer in Grant types of the application.
-
Upload the certificate of the client in Client cert on the Security tab of the application. Casdoor verifies assertions with the public key of that certificate.
-
Create the assertion: a JWT that is signed with the private key of the client and contains the following claims:
Claim Description issIssuer — the client_idof the applicationsubSubject — the client_idof the applicationaudAudience — the Casdoor token endpoint URL expExpiry time (Unix timestamp) -
Send a
POSTrequest tohttps://<casdoor-host>/api/login/oauth/access_token:{
"grant_type": "urn:ietf:params:oauth:grant-type:jwt-bearer",
"client_assertion_type": "urn:ietf:params:oauth:client-assertion-type:jwt-bearer",
"client_assertion": "<signed-JWT>",
"client_id": "CLIENT_ID"
} -
Read the token from the response:
{
    "access_token": "eyJhb...",
    "token_type": "Bearer",
    "expires_in": 10080,
    "scope": "openid"
}
Casdoor verifies the signature and the standard JWT claims. The access token belongs to the application, as with the client credentials grant.
DPoP (sender-constrained tokens)
Casdoor supports Demonstrating Proof of Possession (DPoP, RFC 9449). DPoP binds an access token to a key that the client holds, so that a leaked token is useless without the private key.
To get a DPoP-bound token, send a DPoP header with a DPoP proof JWT in the token request:
POST /api/login/oauth/access_token
DPoP: <DPoP proof JWT>
Casdoor binds the token to the public key of the proof, by its JWK thumbprint (jkt), and returns the token_type DPoP instead of Bearer:
{
    "access_token": "eyJhb...",
    "token_type": "DPoP",
    "expires_in": 10080,
    "scope": "openid"
}
The refresh token request accepts the same DPoP header. Casdoor rejects an invalid proof with the error invalid_dpop_proof.
The discovery document lists the signing algorithms that Casdoor accepts for proofs in dpop_signing_alg_values_supported:
{
    "dpop_signing_alg_values_supported": ["RS256", "RS512", "ES256", "ES384", "ES512", "PS256", "PS384", "PS512"]
}
The token introspection response shows the key binding in the cnf.jkt claim (RFC 9449, section 8).
Verify an access token
Casdoor supports token introspection (RFC 7662). Authenticate the request with HTTP Basic authentication, with the client ID as the username and the client secret as the password:
POST /api/login/oauth/introspect HTTP/1.1
Host: CASDOOR_HOST
Accept: application/json
Content-Type: application/x-www-form-urlencoded
Authorization: Basic Y2xpZW50X2lkOmNsaWVudF9zZWNyZXQ=

token=ACCESS_TOKEN&token_type_hint=access_token
Example response:
{
    "active": true,
    "client_id": "c58c...",
    "username": "admin",
    "token_type": "Bearer",
    "exp": 1647138242,
    "iat": 1646533442,
    "nbf": 1646533442,
    "sub": "7a6b4a8a-b731-48da-bc44-36ae27338817",
    "aud": [
        "c58c..."
    ],
    "iss": "http://localhost:8000"
}
Alternatively, verify the signature of the token yourself with the public key of the application's certificate, or with the keys of the JWKS endpoint. The SDKs do this in ParseJwtToken().
Use an access token
Send the access token to call the Casdoor API. For example, call /api/userinfo in one of two ways:
- With the
Authorizationheader:Authorization: Bearer <access-token> - With a query parameter:
https://<casdoor-host>/api/userinfo?accessToken=<access-token>
Casdoor returns the fields of the user that the scope of the token allows:
{
    "sub": "7a6b4a8a-b731-48da-bc44-36ae27338817",
    "iss": "http://localhost:8000",
    "aud": "c58c..."
}
To get more fields, request more scopes in the authorization request.
UserInfo and get-account
| Endpoint | Returns |
|---|---|
/api/userinfo | The standard OpenID Connect (OIDC) claims of the user, limited by the scopes of the token |
/api/get-account | The complete user object of the signed-in account. This endpoint is specific to Casdoor. It includes the access token of the external OAuth provider, if there is one |
Get the access token of an external provider
When a user signs in through an external OAuth provider, such as GitHub or Google, Casdoor stores the access token of that provider in the originalToken field of the user. Your application can use it to call the API of the provider, such as the GitHub API or the Google Drive API, on behalf of the user, without another OAuth flow.
Read the token from /api/get-account:
{
  "status": "ok",
  "data": {
    "name": "user123",
    "originalToken": "ya29.a0AfH6SMBx...",
    ...
  }
}
Casdoor returns originalToken only to the user and to administrators. For all other requesters, it masks the field.