Kubernetes
According to the Kubernetes documentation, the API Server of Kubernetes can be authenticated using OpenID Connect (OIDC). Ця стаття допоможе вам налаштувати аутентифікацію в Kubernetes за допомогою Casdoor.
Вимоги до середовища
Необхідні умови:
- Кластер Kubernetes.
- A Casdoor application like this demo website.
- Інструмент командного рядка kubectl (необов'язково).
Kubernetes oidc-issuer-url only accepts URLs which use the https:// prefix.
Отже, ваш додаток Casdoor має бути розгорнутий на веб-сайті з HTTPS.
Крок 1: Створення додатку Casdoor та облікового запису користувача для аутентифікації
In Casdoor add an application (e.g. Kubernetes). Note Name, Organization, Client ID, and Client secret. Enable the grant types the cluster will use.
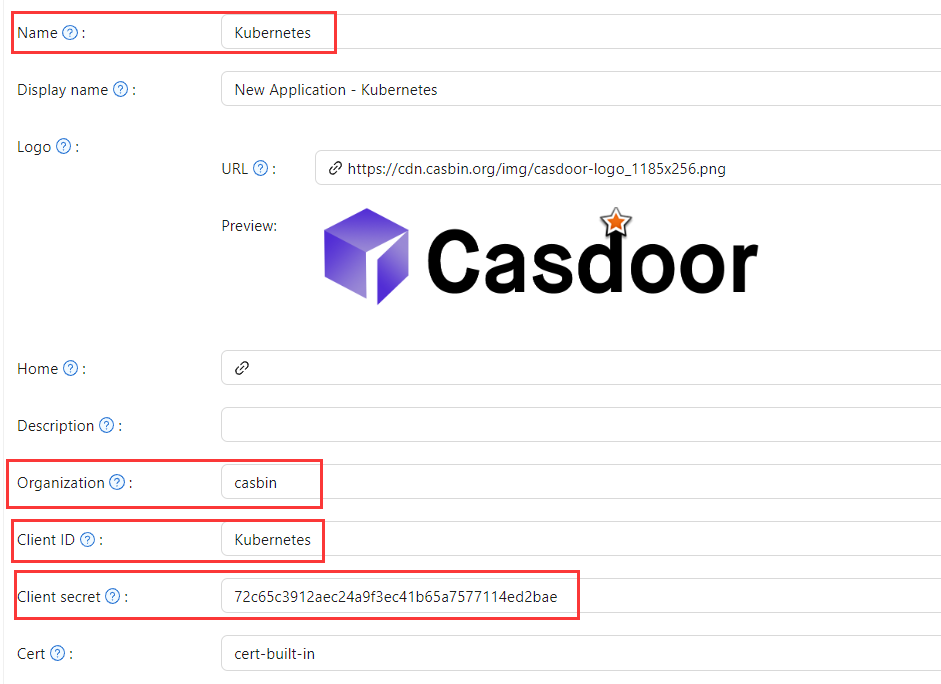

Add a user; set Organization and Signup application to the application you created.
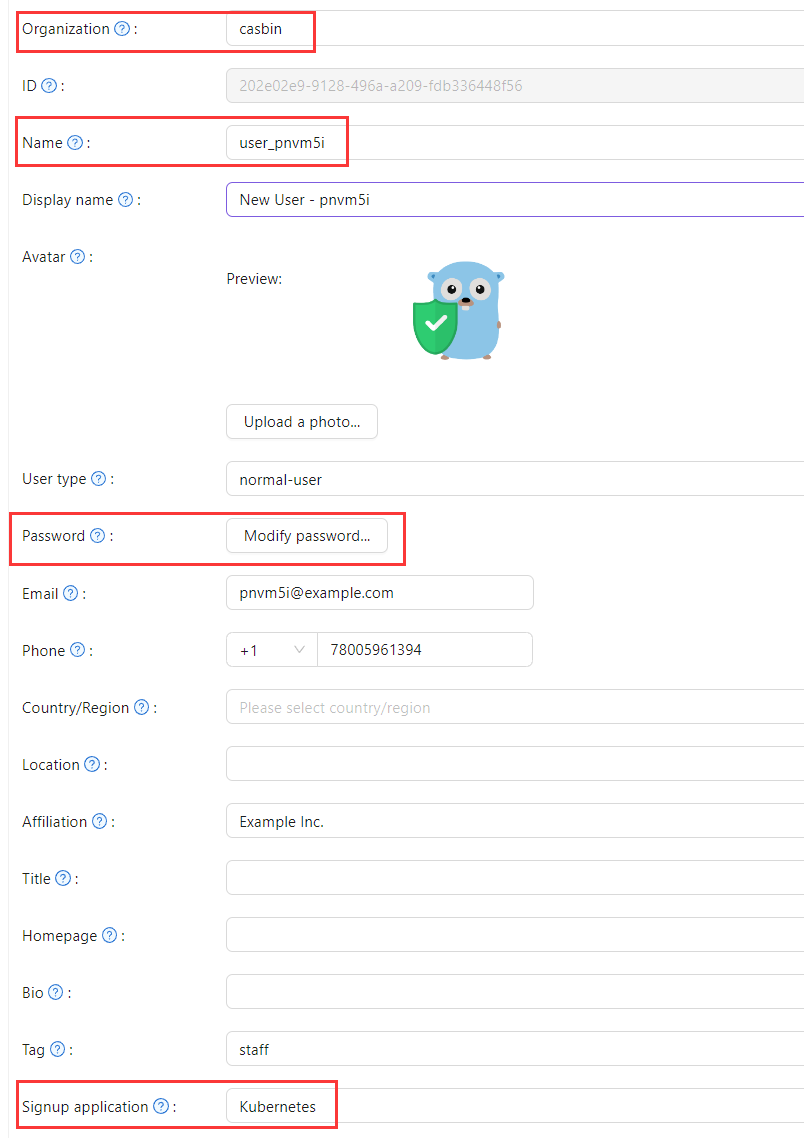
Крок 2: Налаштування сервера API Kubernetes з аутентифікацією OIDC
To enable the OIDC plugin, set the following flags on the API server:
--oidc-issuer-url: URL of the provider that allows the API server to discover public signing keys.--oidc-client-id: A client id that all tokens must be issued for.
Ця стаття використовує minikube для демонстрації. Configure the OIDC plugin for the minikube API server using the following command at startup:
minikube start --extra-config=apiserver.oidc-issuer-url=https://demo.casdoor.com --extra-config=apiserver.oidc-client-id=294b09fbc17f95daf2fe
Крок 3: Тестування аутентифікації OIDC
Отримання інформації для аутентифікації
Через відсутність фронтенду в kubectl, аутентифікацію можна виконати, надіславши POST-запит на сервер Casdoor.
Here is the code in Python which sends a POST request to the Casdoor server
and retrieves the id_token and refresh_token:
import requests
import json

url = "https://demo.casdoor.com/api/login/oauth/access_token"
payload = json.dumps({
   "grant_type": "password",
   "client_id": "Kubernetes",
   "client_secret": "72c65c3912aec24a9f3ec41b65a7577114ed2bae",
   "username": "user_3u94sf",
   "password": "123456"
})
response = requests.request("POST", url, data=payload)

print(response.text)
Після виконання цього коду ви маєте отримати відповідь, подібну до наступної:
{
  "access_token": "xxx",
  "id_token": "yyy",
  "refresh_token": "zzz",
  "token_type": "Bearer",
  "expires_in": 72000,
  "scope": ""
}
Use the obtained id_token to authenticate with the Kubernetes API server.
Аутентифікація на основі HTTP-запиту
Додайте токен до заголовка запиту.
curl https://www.xxx.com -k -H "Authorization: Bearer $(id_token)"
https://www.xxx.comis the Kubernetes API server deployment address.
Аутентифікація на основі клієнта Kubectl
Метод файлу конфігурації
Write the following configuration to the ~/.kube/config file.
Вам слід замінити кожен елемент конфігурації у файлі конфігурації вище на значення, які ви отримали раніше.
users:
- name: minikube
  user:
    auth-provider:
      config:
        client-id: Kubernetes
        client-secret: 72c65c3912aec24a9f3ec41b65a7577114ed2bae
        id-token: $(id_token)
        idp-issuer-url: https://demo.casdoor.com
        refresh-token: $(refresh_token)
      name: oidc
Access the API server with kubectl. Спробуйте виконати тестову команду.
kubectl cluster-info
Метод аргументу командного рядка
Alternatively, pass the id_token in kubectl command-line parameters.
kubectl --token=$(id_token) cluster-info