Kubernetes
According to the Kubernetes documentation, the API Server of Kubernetes can be authenticated using OpenID Connect (OIDC). Cet article vous guidera sur la configuration de l'authentification dans Kubernetes en utilisant Casdoor.
Exigences de l'environnement
Prérequis:
- Un cluster Kubernetes.
- A Casdoor application like this demo website.
- Outil de commande kubectl (facultatif).
Kubernetes oidc-issuer-url only accepts URLs which use the https:// prefix.
Donc, votre application Casdoor devrait être déployée sur un site Web HTTPS.
Étape 1 : Créer une application Casdoor et un compte utilisateur pour l'authentification
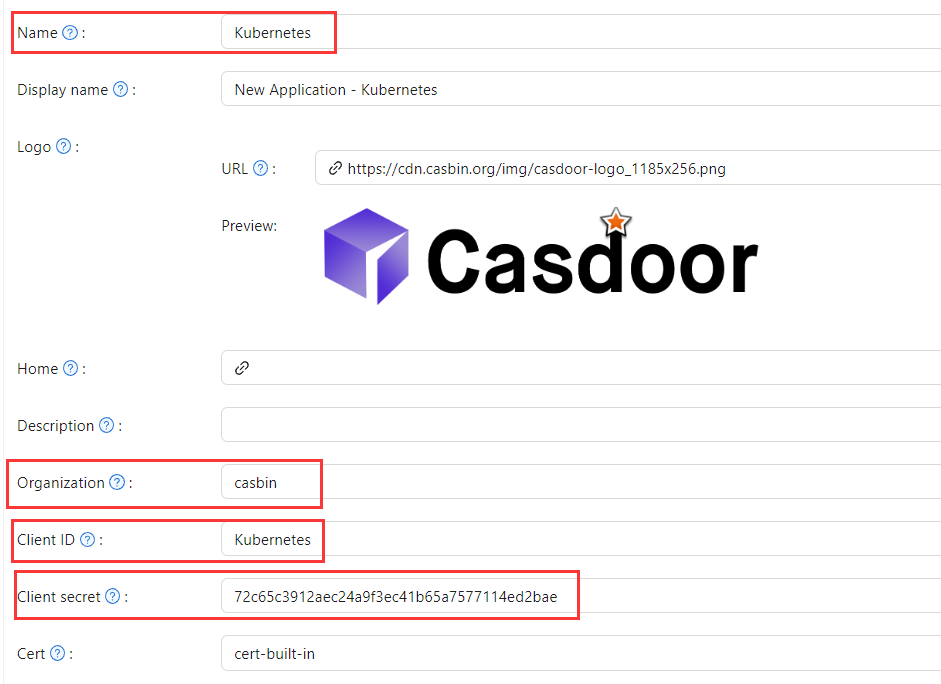
In Casdoor add an application (e.g. Kubernetes). Note Name, Organization, Client ID, and Client secret. Enable the grant types the cluster will use.

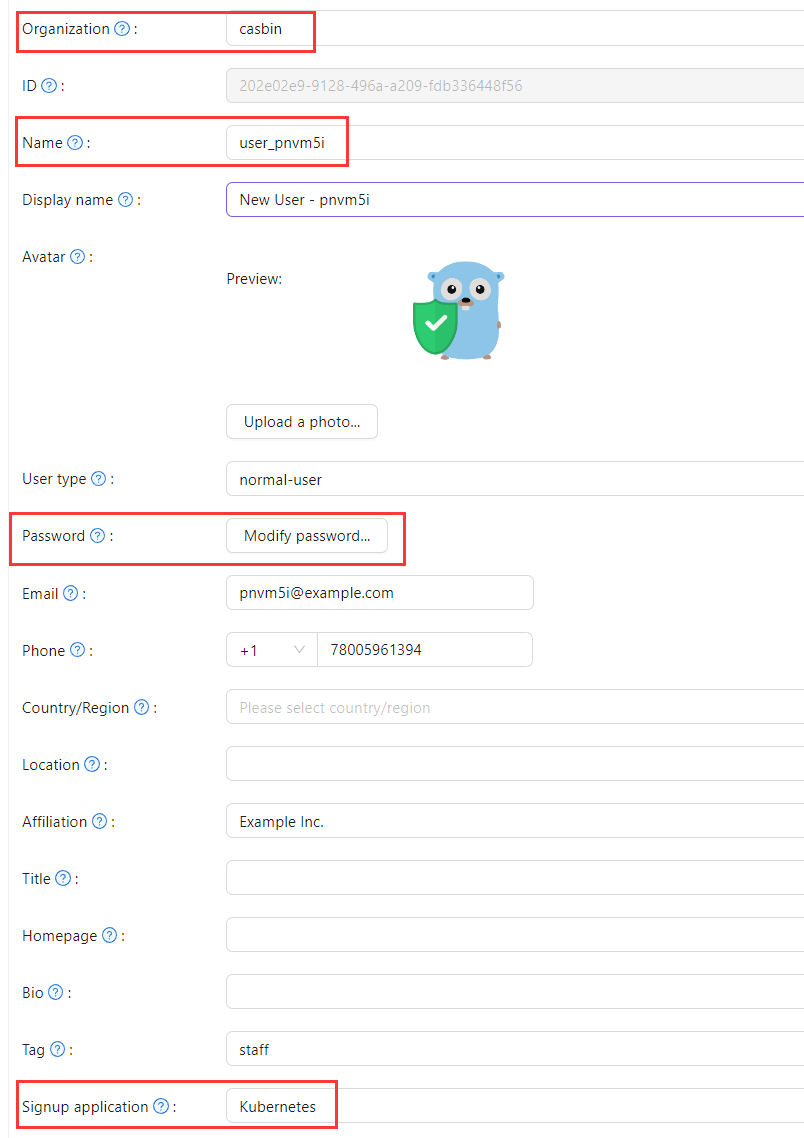
Add a user; set Organization and Signup application to the application you created.
Étape 2 : Configurer le serveur API Kubernetes avec l'authentification OIDC
To enable the OIDC plugin, set the following flags on the API server:
--oidc-issuer-url: URL of the provider that allows the API server to discover public signing keys.--oidc-client-id: A client id that all tokens must be issued for.
Cet article utilise minikube à des fins de démonstration. Configure the OIDC plugin for the minikube API server using the following command at startup:
minikube start --extra-config=apiserver.oidc-issuer-url=https://demo.casdoor.com --extra-config=apiserver.oidc-client-id=294b09fbc17f95daf2fe
Étape 3 : Tester l'authentification OIDC
Obtenir les informations d'authentification
En raison de l'absence d'une interface utilisateur dans kubectl, l'authentification peut être effectuée en envoyant une requête POST au serveur Casdoor.
Here is the code in Python which sends a POST request to the Casdoor server
and retrieves the id_token and refresh_token:
import requests
import json

url = "https://demo.casdoor.com/api/login/oauth/access_token"
payload = json.dumps({
   "grant_type": "password",
   "client_id": "Kubernetes",
   "client_secret": "72c65c3912aec24a9f3ec41b65a7577114ed2bae",
   "username": "user_3u94sf",
   "password": "123456"
})
response = requests.request("POST", url, data=payload)

print(response.text)
Après avoir exécuté ce code, vous devriez recevoir une réponse similaire à la suivante :
{
  "access_token": "xxx",
  "id_token": "yyy",
  "refresh_token": "zzz",
  "token_type": "Bearer",
  "expires_in": 72000,
  "scope": ""
}
Use the obtained id_token to authenticate with the Kubernetes API server.
Authentification basée sur la requête HTTP
Ajoutez le jeton à l'en-tête de la requête.
curl https://www.xxx.com -k -H "Authorization: Bearer $(id_token)"
https://www.xxx.comis the Kubernetes API server deployment address.
Authentification basée sur le client Kubectl
Méthode de fichier de configuration
Write the following configuration to the ~/.kube/config file.
Vous devriez remplacer chaque élément de configuration dans le fichier de configuration ci-dessus par les valeurs que vous avez obtenues précédemment.
users:
- name: minikube
  user:
    auth-provider:
      config:
        client-id: Kubernetes
        client-secret: 72c65c3912aec24a9f3ec41b65a7577114ed2bae
        id-token: $(id_token)
        idp-issuer-url: https://demo.casdoor.com
        refresh-token: $(refresh_token)
      name: oidc
Access the API server with kubectl. Essayez d'exécuter une commande de test.
kubectl cluster-info
Méthode d'argument de ligne de commande
Alternatively, pass the id_token in kubectl command-line parameters.
kubectl --token=$(id_token) cluster-info