Kubernetes
According to the Kubernetes documentation, the API Server of Kubernetes can be authenticated using OpenID Connect (OIDC). Dieser Artikel wird Sie anleiten, wie Sie die Authentifizierung in Kubernetes unter Verwendung von Casdoor konfigurieren.
Systemanforderungen
Voraussetzungen:
- Ein Kubernetes-Cluster.
- A Casdoor application like this demo website.
- kubectl-Befehlswerkzeug (optional).
Kubernetes oidc-issuer-url only accepts URLs which use the https:// prefix.
Ihre Casdoor-Anwendung sollte also auf einer HTTPS-Website bereitgestellt werden.
Schritt 1: Erstellen einer Casdoor-App und eines Benutzerkontos für die Authentifizierung
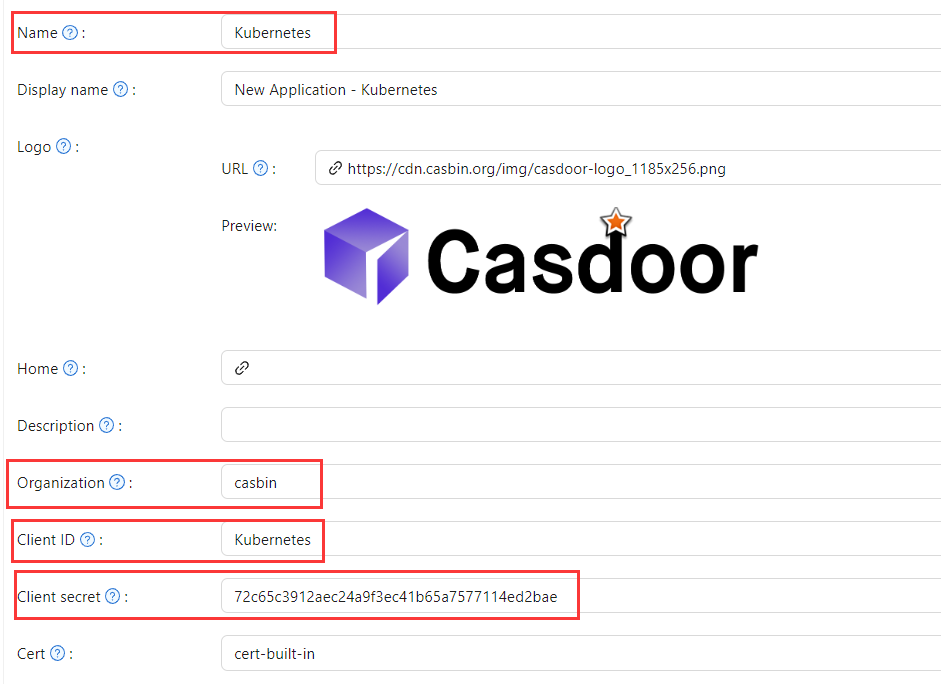
In Casdoor add an application (e.g. Kubernetes). Note Name, Organization, Client ID, and Client secret. Enable the grant types the cluster will use.

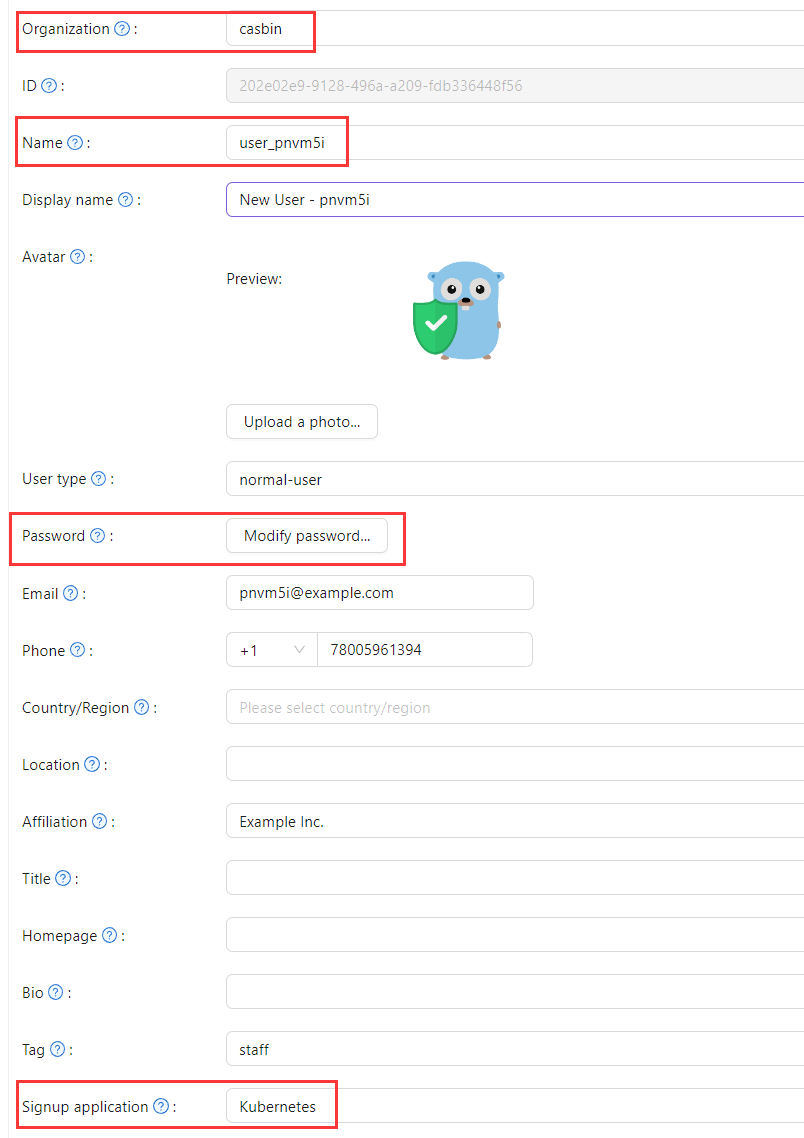
Add a user; set Organization and Signup application to the application you created.
Schritt 2: Konfigurieren des Kubernetes API-Servers mit OIDC-Authentifizierung
To enable the OIDC plugin, set the following flags on the API server:
--oidc-issuer-url: URL of the provider that allows the API server to discover public signing keys.--oidc-client-id: A client id that all tokens must be issued for.
Dieser Artikel verwendet Minikube zur Demonstration. Configure the OIDC plugin for the minikube API server using the following command at startup:
minikube start --extra-config=apiserver.oidc-issuer-url=https://demo.casdoor.com --extra-config=apiserver.oidc-client-id=294b09fbc17f95daf2fe
Schritt 3: OIDC-Authentifizierung testen
Authentifizierungsinformationen abrufen
Aufgrund des Fehlens einer Frontend in kubectl kann die Authentifizierung durch Senden einer POST-Anfrage an den Casdoor-Server durchgeführt werden.
Here is the code in Python which sends a POST request to the Casdoor server
and retrieves the id_token and refresh_token:
import requests
import json

url = "https://demo.casdoor.com/api/login/oauth/access_token"
payload = json.dumps({
   "grant_type": "password",
   "client_id": "Kubernetes",
   "client_secret": "72c65c3912aec24a9f3ec41b65a7577114ed2bae",
   "username": "user_3u94sf",
   "password": "123456"
})
response = requests.request("POST", url, data=payload)

print(response.text)
Nachdem Sie diesen Code ausgeführt haben, sollten Sie eine ähnliche Antwort wie die folgende erhalten:
{
  "access_token": "xxx",
  "id_token": "yyy",
  "refresh_token": "zzz",
  "token_type": "Bearer",
  "expires_in": 72000,
  "scope": ""
}
Use the obtained id_token to authenticate with the Kubernetes API server.
HTTP-Anfragebasierte Authentifizierung
Fügen Sie das Token zum Anfrageheader hinzu.
curl https://www.xxx.com -k -H "Authorization: Bearer $(id_token)"
https://www.xxx.comis the Kubernetes API server deployment address.
Kubectl-Client-basierte Authentifizierung
Konfigurationsdatei-Methode
Write the following configuration to the ~/.kube/config file.
Sie sollten jedes Konfigurationselement in der obigen Konfigurationsdatei durch die Werte ersetzen, die Sie zuvor erhalten haben.
users:
- name: minikube
  user:
    auth-provider:
      config:
        client-id: Kubernetes
        client-secret: 72c65c3912aec24a9f3ec41b65a7577114ed2bae
        id-token: $(id_token)
        idp-issuer-url: https://demo.casdoor.com
        refresh-token: $(refresh_token)
      name: oidc
Access the API server with kubectl. Versuchen Sie, einen Testbefehl auszuführen.
kubectl cluster-info
Kommandozeilenargument-Methode
Alternatively, pass the id_token in kubectl command-line parameters.
kubectl --token=$(id_token) cluster-info